Sell Technical

Uncategorized

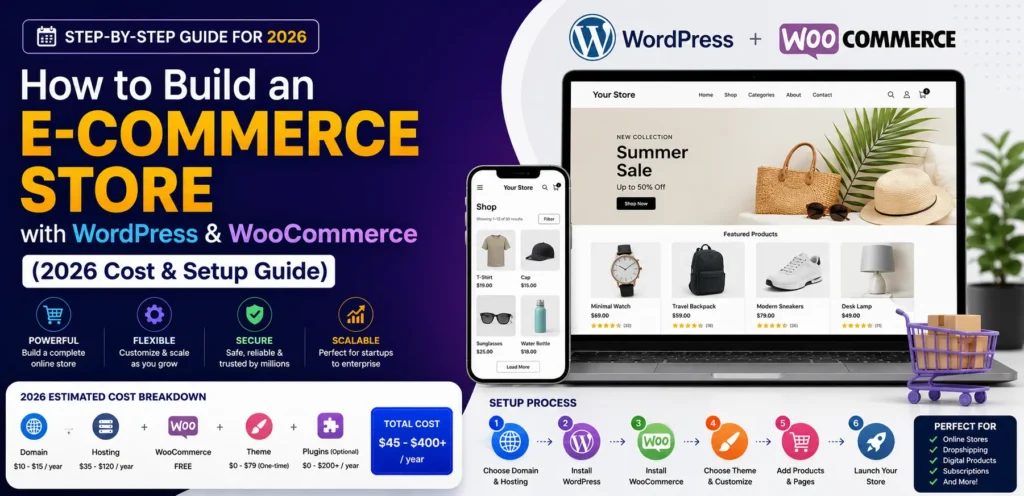
How to Build an E-Commerce Store with WordPress & WooCommerce (2026 Cost & Setup Guide)

Introduction WordPress runs a huge share of the internet, and WooCommerce is the platform most of those sites lean on when they start selling — commonly cited estimates put it powering somewhere around a third of online stores worldwide. That popularity is real, but it can also be misleading: “free and open-source” makes WooCommerce sound like a zero-cost decision, when the actual cost and effort show up in the choices you make around it. This guide skips the generic click-by-click tutorial (plenty of those already exist) and focuses on what actually matters if you’re deciding whether to build an e-commerce store with WordPress and WooCommerce yourself, hand it to a developer, or consider a different platform entirely — plus the practical, India-specific details most generic tutorials skip. What WooCommerce Actually Is WooCommerce is a free plugin that turns a standard WordPress site into a functioning online store — product pages, a shopping cart, checkout, and order management. It doesn’t replace WordPress, it extends it. That distinction matters because it means your store inherits both WordPress’s flexibility and its maintenance responsibilities — plugin updates, security patches, and hosting performance are all now part of running your store, not just your blog. The Real Cost Breakdown “WooCommerce is free” is technically true and practically misleading. Here’s where the actual money goes: Web Hosting: The single biggest ongoing cost, and the one most likely to get underbought. Budget shared hosting will struggle once you have real product volume and traffic. Domain Registration: A small annual cost, but worth registering somewhere reputable with easy DNS control. A WooCommerce-Compatible Theme: Free themes exist, but a premium theme built specifically for e-commerce usually pays for itself in fewer layout headaches later. Premium Plugins: SEO, security, backups, and page builders are the usual list, free tiers cover basics, but a serious store typically needs at least one or two paid upgrades. Payment Gateway Fees :  A per-transaction cost, not a platform cost, but easy to forget when budgeting. Developer Time: Either yours, or someone you hire. This is the cost most DIY estimates leave out entirely, and it’s usually the largest one in practice. Setup Overview: What the Process Actually Involves At a high level, building a WooCommerce store means working through these stages in order: Register a domain and choose hosting Install WordPress (most hosts offer one-click installation) Install and activate the WooCommerce plugin, then run its setup wizard Choose a WooCommerce-compatible theme suited to your product type Configure payment gateways and shipping options Add products, categories, and core pages (About, Contact, Returns, Privacy Policy) Set up security (SSL, backups, a security plugin) Test the full checkout flow before going live None of these steps are individually hard — WooCommerce’s setup wizard genuinely does walk you through the basics. What determines whether the end result performs well is the quality of the decisions made at each stage, which is what the rest of this guide focuses on. Choosing the Right Hosting Type Not all hosting is equal, and this is the decision beginners most often underinvest in: Shared hosting is the cheapest option and fine for testing an idea or a very small catalog, but performance degrades fast once you have real traffic, since you’re sharing server resources with other sites you have no control over. VPS (Virtual Private Server) hosting gives you dedicated resources at a moderate cost increase — a reasonable middle ground once your store has consistent traffic and you want more predictable performance. Managed WooCommerce hosting is built specifically for WooCommerce stores — optimized server configurations, automatic updates, and built-in caching designed around WooCommerce’s specific performance needs. It costs more than generic hosting, but for a store where speed directly affects conversion and search ranking, it’s often the better long-term value rather than the more expensive option it appears to be upfront. Essential Plugins and Integrations for Indian Sellers Beyond the core setup wizard, a few categories of plugins matter specifically for running a store in India: Payment gateways: Razorpay and PayU are the most commonly integrated options for Indian WooCommerce stores, supporting UPI, cards, and net banking in one integration rather than stitching together separate providers. Shipping integrations: Plugins connecting to Indian logistics providers (Shiprocket and similar aggregators) let you compare courier rates and generate labels without leaving WordPress — a meaningful time saver once order volume grows past a handful a day. GST invoicing: A dedicated GST invoicing plugin that auto-generates compliant tax invoices per order saves significant manual work compared to creating invoices by hand, and reduces the compliance risk of getting the format wrong. Security and backups: A dedicated security plugin plus automated off-site backups aren’t optional for a store handling payment and customer data — e-commerce sites are disproportionately targeted by attackers precisely because there’s something valuable to steal. Mobile Optimization and Speed Most shopping traffic arrives on mobile, and a store that performs well on desktop but is clumsy on a phone is losing far more revenue than most owners realize. A few WooCommerce-specific speed considerations: product image sizes compound quickly across a large catalog, so compression matters more here than on a typical content site, too many active plugins is a common, quietly expensive drag on load time, and caching configured specifically for dynamic WooCommerce pages (cart, checkout) — not just static content — makes a measurable difference. These same fundamentals feed directly into ranking performance, which we cover in more depth in our e-commerce website SEO guide. Legal and Compliance Essentials This is the section most DIY tutorials skip entirely, and it’s not optional for a store operating in India: GST registration and invoicing for applicable product categories and turnover thresholds. A clear Return & Refund Policy page — required by most payment gateways as a condition of approval, not just good practice. Terms & Conditions and Privacy Policy pages — expected by payment processors and increasingly by customers evaluating whether to trust a new store. Shipping Policy — setting clear expectations reduces
Uncategorized

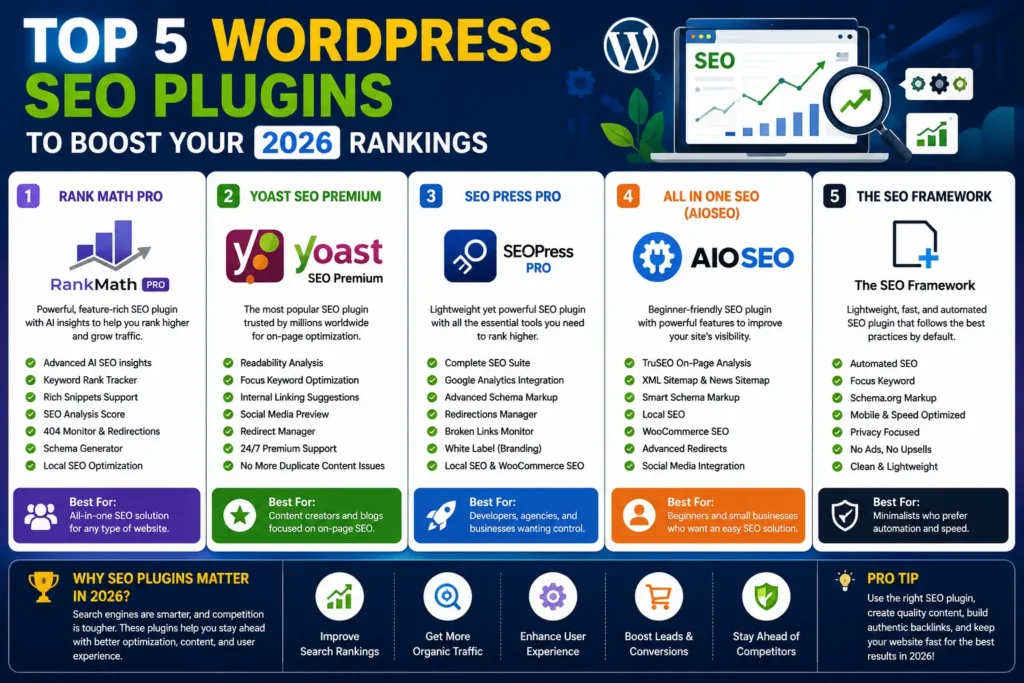
Top 5 WordPress SEO Plugins to Boost Your 2026 Rankings

Introduction Every year, Google updates its ranking algorithms – making on‑page and technical SEO more critical than ever, and 2026 has added a new wrinkle: structured data and clear entity signals matter more than ever now that AI-generated search summaries pull directly from well-marked-up pages. Choosing the right WordPress SEO plugin for your site can mean the difference between languishing on page 10 and rising to the coveted top spots. In this guide, we’ll walk through the best SEO plugins for 2026, their key features, pricing, and which one is actually right for your site. I. Rank Math Pro Key Features AI‑Powered Content Analysis: Real‑time suggestions for keyword usage, readability, and internal linking Schema Generator: Supports 20+ schema types—including Service, FAQ, and HowTo—without addons Advanced Redirection Manager: 301, 302, and 410 redirects with automatic 404 monitoring Local SEO Module: Optimizes your Google Business Profile data and local schema Modular Architecture: Enable only the features you need for lean performance Pricing Free version with most core features unlocked, Pro and Business/Agency tiers available — confirm current pricing and site limits directly on rankmath.com, as tiers have shifted since this was last checked. Why We Love It Rank Math’s intuitive setup wizard and deep integration with both WordPress and Google Search Console make it a one‑stop solution – ideal for agencies and power users who demand performance without bloat, and its schema depth matters even more now that AI search summaries lean heavily on structured data. II. Yoast SEO Premium Key Features Cornerstone Content: Identify and promote your most important posts Internal Linking Suggestions: AI‑powered prompts right in the editor Redirect Manager: Seamless 301 redirects when you delete or change URLs Multiple Keyword Optimization: Optimize for up to 5 keyphrases per page (Premium only) Schema Enhancements: Basic schema out of the box plus social profiles Pricing Free version covers core on‑page analysis and XML sitemaps; Premium is a paid annual license per site — verify current pricing on yoast.com before publishing. Why We Love It Yoast’s long‑standing reputation, frequent updates, and user‑friendly interface make it a top choice for beginners and those migrating from basic builtin SEO. III. SEO Press Pro Key Features White‑Label Interface: Perfect for agency branding Breadcrumbs & Sitemaps: HTML, XML, video, news, and image sitemaps Schema Pro: Deep support for rich snippets (local business, recipes, events) WooCommerce SEO: Product breadcrumbs, structured data, and social share images Google Analytics Integration: Track UTM campaigns and download behavior within WordPress Pricing Free version supports unlimited sites with essentials included. Pro is a flat annual fee — confirm current site-count limits on seopress.org, as this has been reported differently across sources. Why We Love It SEOPress’s flat‑rate pricing model and lightweight footprint deliver strong value for small agencies and freelancers managing multiple client sites. IV. All in One SEO (AIOSEO) Key Features Smart XML Sitemaps: Automatically notifies Google & Bing of changes Link Assistant: Finds and suggests internal and external linking opportunities Local SEO Addon: Google Maps integration, local business schema, and store locator eCommerce SEO: Product schema, rich snippets, and WooCommerce integration Performance Manager: Loads modules as needed to minimize overhead Pricing Free version includes basic on‑page tools and sitemaps; paid tiers scale by site count and feature depth — confirm current tier pricing on aioseo.com. Why We Love It AIOSEO strikes a balance between feature‑richness and simplicity, with strong e‑commerce support that’s a natural fit for WooCommerce stores — if you’re running a WooCommerce site alongside marketplace channels, this pairs well with the broader strategy in our e-commerce website SEO guide. V. The SEO Framework Key Features Lightweight & Fast: Built to meet WordPress performance standards AI‑Generated Descriptions: Automated, context‑aware meta descriptions Critical CSS Integration: Ensures your SEO plugin doesn’t slow you down Structured Data Out of the Box: Article, breadcrumb, and blogposting schemas Extension Manager: Add local SEO, AMP, and social meta modules as needed Pricing Free core plugin is fully functional; an extensions bundle unlocks premium features — confirm current bundle pricing on theseoframework.com. Why We Love It If you value speed above all, The SEO Framework’s lean codebase and granular controls make it the go‑to for developers and performance‑obsessed site owners. How to Choose the Right Plugin for You Plugin Best For Ideal Use Case Rank Math Pro Agencies & Power Users Multi-site management, deep SEO automation Yoast SEO Premium Beginners & Bloggers Easy onboarding, strong community support SEOPress Pro Agencies & Freelancers White-label projects, unlimited sites AIOSEO eCommerce & SMBs WooCommerce stores, local business optimization The SEO Framework Developers & Performance Fans Speed-critical sites, lightweight footprints A quick note: you only need one all-in-one SEO plugin running at a time — installing two in parallel causes conflicting sitemaps and duplicate schema output more often than it adds value. Getting Started in 2026 Backup Your Site: Always back up before installing or switching plugins. Run an Audit: Identify your existing gaps — titles, meta, schema, speed, and Core Web Vitals specifically, since these carry more ranking weight than they did even a year ago. Install & Configure: Use the plugin’s setup wizard and follow platform‑specific guides. Monitor & Refine: Set up Google Search Console, track keyword rankings, and refine your settings monthly rather than setting it up once and forgetting it. If your site sells products directly rather than just publishing content, pair whichever plugin you choose with the structural fundamentals covered in our e-commerce website SEO guide — a plugin handles the technical layer, but category and product page structure still needs to be built deliberately. Final Thoughts The “best” WordPress SEO plugin genuinely depends on what you’re running — an agency managing dozens of client sites has different needs than a solo blogger or a WooCommerce store selling directly to customers. What matters more than which logo you pick is actually using the plugin deliberately: keeping schema current, monitoring Search Console monthly, and treating the plugin as one layer of a broader strategy rather than the whole strategy itself. Let Us Handle Your SEO

Uncategorized

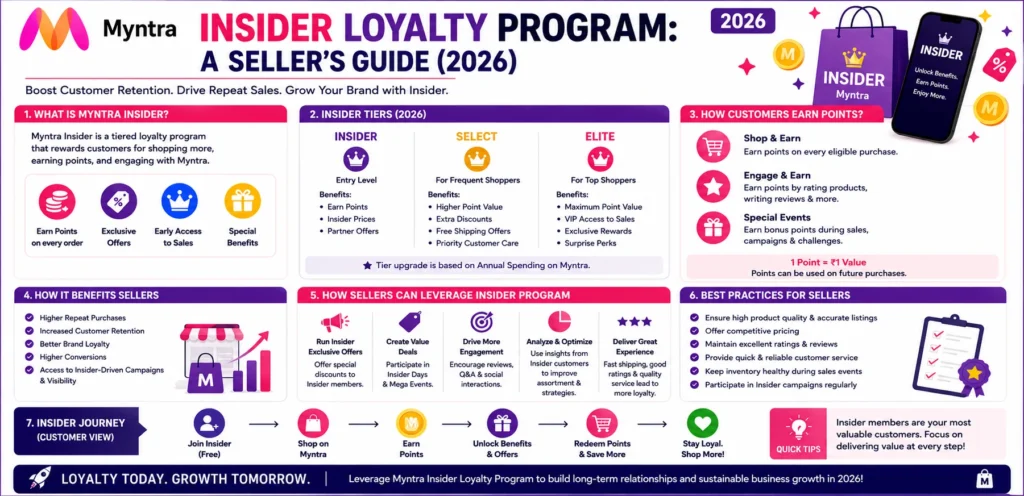
Myntra Insider Loyalty Program: A Seller’s Guide (2026)

Introduction Myntra’s biggest advantage as a marketplace isn’t just its traffic — it’s how many of those shoppers keep coming back. That’s largely down to Myntra Insider, Myntra’s loyalty program: a points-and-tiers system that rewards shoppers for browsing, wishlisting, and buying, and redeems those points (SuperCoins) across a wide network of partner brands. For sellers, understanding how Insider shoppers behave — and positioning your listings and promotions accordingly — is a genuinely underused lever. Most sellers optimize listings and ads and never think about the loyalty layer sitting on top of the whole platform. This guide covers what the Myntra loyalty program actually does and how to build around it. What Myntra Insider Actually Is Insider is a free-to-join, tiered loyalty program for Myntra shoppers. A few things make it distinct from typical marketplace loyalty schemes: Low barrier to entry — points start accruing from very small spend thresholds, not just large orders Gamified engagement — shoppers earn points for actions beyond purchasing, including browsing and wishlisting, which keeps them active on the platform between purchases Tiered progression — higher tiers unlock better perks, giving shoppers a reason to keep shopping specifically on Myntra rather than switching platforms Cross-brand redemption — points (SuperCoins) can be redeemed with partner brands across dining, travel, and entertainment, which extends the program’s value well beyond fashion The practical takeaway for sellers: Insider members aren’t just repeat Myntra shoppers, they’re shoppers who’ve been given real incentives to stay loyal to the platform itself. That loyalty is worth positioning your brand around. Why This Matters for Sellers Loyalty-program members behave differently from one-time buyers in ways that directly affect your numbers: They’re more likely to complete a purchase once they’ve engaged with a listing, since they’re already invested in the platform’s reward loop They respond strongly to early access and exclusive framing, since that’s exactly what the program trains them to expect They tend to have higher lifetime value, since Myntra actively incentivizes them to keep shopping there over other platforms None of this means you need a special program enrollment to benefit — it means your regular promotional strategy should account for how this audience actually shops. How to Position Your Brand Around Insider Shopper Behavior Align with Myntra’s major sale calendar: Insider members typically get early access to events like the End of Reason Sale and major festive collections. Having your listings, stock, and creative ready ahead of these windows — not scrambling once a sale starts — is where sellers consistently leave visibility on the table. Build bundles that reward higher basket size: Since points and redemption value scale with spend, curated bundles (“buy two, save more”) tend to perform well with an audience that’s already primed to think in terms of accumulating value, not just getting the lowest price on one item. Lean on your Myntra category manager for featured placement opportunities: Myntra runs curated promotional placements tied to sales events and shopper segments — worth a direct conversation with your account contact rather than assuming these are self-serve. Prioritize return rate and review quality: Since repeat purchase behavior is central to how this audience shops, a clean returns record and strong reviews compound over time in a way they don’t for one-off buyers. A note on specifics: Myntra doesn’t always publish granular seller-facing program mechanics (exact eligibility criteria for featured placements, for instance) externally, and these can change. If you’re pursuing a specific promotional opportunity tied to Insider shoppers, confirm current requirements directly with your Myntra Partner Portal or account manager rather than relying on any published guide, including this one. Metrics Worth Tracking Rather than chasing a specific external benchmark, track these against your own baseline over time: Metric Why It Matters Average Order Value (AOV) Shows whether bundling and cross-sell strategies are working Repeat Purchase Rate The core signal that loyalty-driven positioning is paying off Return Rate Directly affects your standing for any featured placement opportunities Review Volume & Rating Compounds over time with a loyalty-driven, repeat-buying audience Your Myntra Partner Portal analytics are the right place to monitor these on an ongoing basis. Final Thoughts The Myntra loyalty program isn’t something sellers opt into directly — it’s a shopping behavior pattern built into the platform that smart sellers design around. Understanding how Insider members actually shop, timing your promotions to their expectations, and building consistent quality that earns repeat purchases will do more for your numbers than chasing any specific program mechanic. If you want help building promotions and listings that actually align with how Myntra’s most loyal shoppers behave, Sell Technical handles Myntra account management and Myntra sales boost strategy end to end. FAQs – Myntra Loyalty Program for Sellers What is Myntra Insider? Myntra’s loyalty program for shoppers — a free, tiered, points-based system where members earn rewards for browsing, wishlisting, and purchasing, redeemable across Myntra and partner brands. Is there a separate loyalty program sellers can apply to? Myntra doesn’t publicly document a standardized seller-facing enrollment program for Insider. Featured placement and promotional opportunities tied to loyalty shoppers are generally coordinated through your Myntra account manager rather than a self-serve application. How can sellers benefit from Myntra’s loyalty shoppers without a formal program? By aligning promotions with Myntra’s major sale calendar, building bundles that reward higher spend, and maintaining low return rates and strong reviews — all of which matter more to a repeat-purchasing, loyalty-driven audience. Does return rate really affect promotional opportunities on Myntra? Yes — return rate and account health broadly factor into your standing for featured placements and category manager support, since Myntra prioritizes reliable sellers for promoted visibility. Where can I confirm current seller promotional opportunities on Myntra? Directly through your Myntra Partner Portal or your assigned category/account manager — program mechanics can change and aren’t always published externally. Myntra’s loyalty program for shoppers — a free, tiered, points-based system where members earn rewards for browsing, wishlisting, and purchasing, redeemable across Myntra and partner brands. Myntra doesn’t publicly document a

Uncategorized

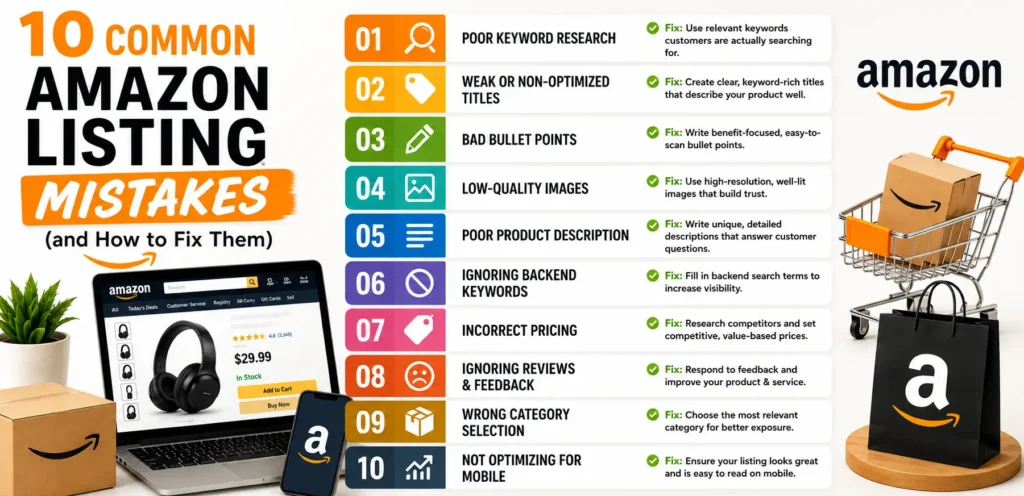
10 Common Amazon Listing Mistakes (and How to Fix Them)

Introduction Amazon is crowded – over 9.7 million sellers worldwide, and more than 2.5 million active products in many categories. Even minor listing errors can bury your product on page 10 of search results. In this guide, we’ll walk through the 10 most frequent listing mistakes, show you real‑world examples, and give step‑by‑step fixes so you can reclaim lost traffic and turn your listings into high‑performing sales engines. I. Weak or Keyword‑Poor Product Titles Why It Matters Your title is Amazon’s #1 ranking signal. A poorly optimized Amazon listing title means fewer impressions, lower click‑through rate (CTR), and lost revenue. Common Mistakes Too short or vague: “Wireless Speakers” Keyword stuffing: “Best Bluetooth Speaker Wireless Speaker Bluetooth Speaker Sale” Missing brand or model details How to Fix It Follow Amazon’s Title Best Practices: Up to 200 characters (but front‑load your top keywords). Format: Brand + Product + Key Feature + Model/Size. Example Before & After: Before: “Wireless Speaker Black” After: “SoundWave SW‑10 Portable Bluetooth Speaker with 12‑Hour Playtime, Waterproof (Black)” Tools to Use: Amazon’s Auto‑Suggest dropdown for keyword ideas. Helium10 or JungleScout for keyword volume data. Getting titles right consistently across dozens of SKUs is exactly the kind of work that’s easy to get right once and let drift over time — it’s a core part of what we handle in Amazon product listing management. II. Bullet Points That Don’t Highlight Benefits Why It Matters Bullets are read by most buyers before purchasing, and feature‑only bullets fail to connect emotionally. Common Mistakes Listing specs without benefits (“Battery: 8 hours”). Typos and inconsistent formatting. How to Fix It Use the FAB Formula (Feature → Advantage → Benefit): Feature: “10‑Hour Battery Life” Advantage: “Keeps music playing all day” Benefit: “Never miss a beat during long outdoor trips” Power Words to Include: “Enjoy,” “Experience,” “Protect,” “Unlock.” Formatting Tips: Start each bullet with a bolded power word (if allowed). Keep each bullet under 200 characters. III. Generic or Low‑Quality Images Why It Matters High-quality images meaningfully improve conversion and are essential for mobile shoppers. Common Mistakes Small, blurry photos. No lifestyle or scale shots. Missing infographics for key features. How to Fix It Follow Amazon’s Image Guidelines:   Main image: Plain white background, product fills 85% of frame, ≥1,000×1,000 px. Secondary images: Lifestyle shots (in use). Scale/context (show sizing next to a person). Infographic overlays (call out material, dimensions). Example: A vacuum listing includes: Main clean product shot. Shot of vacuum cleaning a couch. Graphic showing “2‑In‑1 Cordless & Upright.” Tools & Services:   Canva or Photoshop for infographics. 360° viewer plugins for interactive images. IV. Missing A+ (Enhanced Brand) Content Why It Matters A+ Content educates and persuades buyers in ways plain descriptions can’t. Common Mistakes Plain HTML descriptions only. No comparison charts or brand story modules. How to Fix It Enroll in Brand Registry: Free for trademarked brands—gives access to A+ modules. Build A+ Pages: Module 1: Brand logo + tagline + hero image. Module 2: 3‑column image/text features. Module 3: Comparison table of your product vs. competitors. Copywriting Tips: Tell your brand story in 2‑3 sentences. Include customer testimonials or awards. V. Ignoring Backend Search Terms Why It Matters Backend keywords expand your reach without cluttering front‑end copy. Common Mistakes Leaving them blank. Stuffing with commas or punctuation (Amazon ignores punctuation). How to Fix It Include: Synonyms (“wireless speaker,” “portable speaker”). Common misspellings (“bluettooth,” “blue tooth”). Alternate names (“portable boombox”). Best Practices: 250 char limit, single spaces between phrases. No repeat front‑end keywords. Tools: MerchantWords or Sonar for long‑tail suggestions. VI. Inconsistent or Incorrect Pricing Why It Matters Customers abandon carts when they see inconsistent or non‑competitive pricing. Common Mistakes Pricing too low/too high. Not using Amazon’s “Sale Price” field. How to Fix It Competitive Analysis: Price-match top 10 similar products daily. Use Sale Mechanics: Sale Price + Compare at Price generates urgency. Schedule promotions during Prime Day or other events. Automated Repricing Tools: RepricerExpress or Aura for dynamic adjustments. Before adjusting prices, it’s worth knowing your actual margin after Amazon’s fees — our Amazon Seller Fee Calculator makes that a five-minute check instead of a spreadsheet exercise. VII. Overlooking Customer Reviews & Q&A Why It Matters Q&A and reviews fuel social proof—key for trust and conversion. Common Mistakes Not answering buyer questions. Letting negative reviews go unaddressed. How to Fix It Proactive Outreach: Use Amazon’s “Request a Review” button per order. Respond to Reviews: Acknowledge issues, offer fixes within 48 hours. Thank positive reviewers. Maintain Q&A: Appoint a team member to monitor the “Customer Questions” section daily. VIII. Forgetting Enhanced Brand Storefront Why It Matters A cohesive storefront drives cross‑sales and builds brand loyalty. Common Mistakes Linking only to individual listings. No custom storefront graphics. How to Fix It Create a Storefront Menu: Home → Category → New Arrivals → Best Sellers. Use Rich Media: Banners, videos, lifestyle galleries. Promote Internally: Include storefront link in A+ pages and off‑Amazon ads. IX. Neglecting Mobile Optimization Why It Matters The majority of Amazon shoppers browse on mobile; poor mobile layouts lose buyers instantly Common Mistakes Long text blocks not broken into sections. Images or tables that overflow screens. How to Fix It Mobile‑First Preview: Always use Seller Central’s mobile preview. Use Short Paragraphs: 1–2 sentences max. Avoid Complex Tables: Use bullet‑style lists for specs on mobile. X. Skipping Ongoing Optimization & Testing Why It Matters Amazon’s algorithm and shopper behavior change constantly—your listings must evolve too. Common Mistakes “Set and forget” approach. No data‑driven decision making. How to Fix It Weekly Performance Checks: Keyword rank tracking (e.g., Helium10 Keyword Tracker). Advertising performance in Seller Central. A/B Testing Routine: Rotate main image or title variations every 30 days. Use Amazon Experiments (if Brand Registered). Seasonal Refresh: Update keywords for holiday or festival seasons. Swap in seasonal images (Diwali, Christmas). Bonus Tip: Leverage Automation & Expert Support Even with best practices in place, managing dozens or hundreds of SKUs is a full‑time job. At Sell Technical, we automate key processes as part of full

Uncategorized

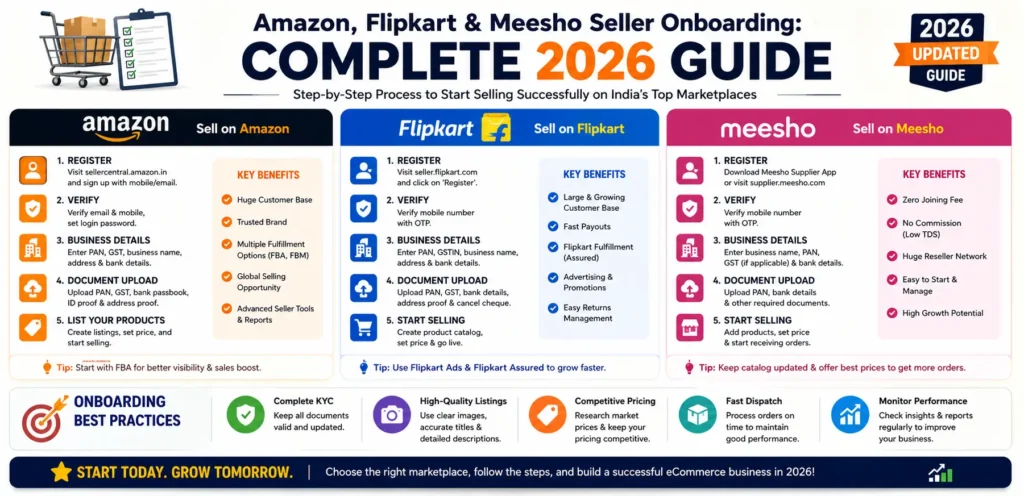
Amazon Flipkart Meesho Seller Onboarding Guide

Introduction Most sellers don’t want to pick one marketplace — they want to be on all three. And that’s a reasonable instinct: Amazon brings premium buyers, Flipkart brings scale in fashion and electronics, and Meesho brings volume in Tier 2-5 towns at zero commission. The problem is that Amazon, Flipkart & Meesho seller onboarding aren’t the same process wearing three different logos. Each platform verifies you differently, asks for different supporting documents depending on your category, and rejects applications for different reasons. This guide walks through what the onboarding process for all three actually looks like side by side — not the pitch for why you should sell on each one, but the practical mechanics of getting approved without unnecessary delays. Why Sellers Onboard on More Than One Platform Relying on a single marketplace is a concentration risk most sellers don’t think about until something goes wrong — a policy change, a sudden suspension, or a category-specific fee hike can wipe out your primary income channel overnight. Sellers who spread across two or three platforms aren’t just chasing more traffic; they’re building redundancy into their business. That said, running three onboarding processes at once isn’t free — it takes real coordination, and rushing any one of them tends to be exactly what triggers delays or rejection. What You’ll Need Before You Start (Common to All Three) Before touching any platform’s registration form, gather these once so you’re not scrambling mid-application: GST registration — required for nearly all product categories on all three platforms PAN card (business or individual, matching your GST details) Bank account details with a cancelled cheque or bank statement Business address proof — utility bill, rent agreement, or ownership document Product category details — some categories need additional approval regardless of platform Having these ready before you begin cuts real time off every platform’s review cycle, since most delays come from documents submitted piecemeal rather than all at once. Amazon, Flipkart & Meesho Onboarding — Side by Side   Amazon Flipkart Meesho Typical approval time 15-30 days 7-15 days 2-7 days Verification strictness Highest Moderate-high Lowest Commission model Category-based, plus fees Category-based, plus fees Zero commission (logistics fee only) Category approval needed Often, for restricted categories Sometimes Rarely Best suited for Branded, premium products Fashion, electronics, mobiles Unbranded, budget, high-volume products Meesho’s speed is real — most sellers we’ve onboarded go live within a week. But faster onboarding also means less platform-side vetting, which shifts more of the quality-control burden onto you as the seller, particularly around return rates and listing accuracy. How Each Platform’s Onboarding Actually Works Amazon runs the most thorough verification of the three — expect identity checks, bank verification, and for certain categories (electronics, health, jewelry), additional category approval that can add another week or two on top of the standard timeline. Amazon onboarding done properly front-loads every document Amazon might ask for, rather than waiting for a request and restarting the clock. Flipkart’s process sits in the middle — GST and bank verification are similarly strict, but fewer categories carry the extra approval layer Amazon requires. Flipkart onboarding tends to move fastest when your GSTIN and business name match exactly across every document submitted; mismatches here are the single most common cause of delay we see. Meesho is deliberately built for fast entry — its zero-commission, reseller-friendly model means verification is lighter and most sellers live within a week. That doesn’t mean Meesho onboarding is risk-free, though — catalog quality and return-rate management matter more here precisely because the platform’s own vetting is lighter. Why Onboarding Applications Actually Get Rejected Across all three platforms, the same handful of issues cause most delays and rejections: Mismatched details — business name, GST, and bank account not matching exactly Blurry or incomplete document uploads — a surprisingly common, entirely avoidable cause Category restrictions — attempting to list in a category that requires approval you haven’t secured yet Address proof inconsistency — registered address not matching what’s on your GST certificate Incomplete bank verification — a cancelled cheque with details that don’t match your account name None of these are complicated problems. They’re just the kind of small, easy-to-overlook details that cost real time when caught after submission instead of before. Should You Onboard All Three at Once, or Sequence Them? If you have the operational bandwidth, running all three in parallel makes sense — the documents overlap heavily, so there’s little extra effort in submitting to all three simultaneously. If you’re a solo seller or a small team, though, sequencing has a real advantage: start with Meesho to validate demand quickly and cheaply, use Flipkart to test a mid-tier audience, and bring Amazon in once you have some sales history and reviews to support your listings — Amazon’s stricter vetting tends to go more smoothly for sellers who already have some track record elsewhere. Final Thoughts Amazon, Flipkart & Meesho seller onboarding isn’t one process — it’s three related but genuinely different ones, each with its own pace and its own tolerance for error. Get your documents consistent and complete before you start, understand which platform matches your product category and stage, and treat the differences between them as a strategic choice rather than an inconvenience. If you’d rather have someone who does this daily handle the paperwork and back-and-forth for you, Sell Technical manages onboarding on Amazon, Flipkart, and Meesho — individually or all at once. Book a free consultation → or call +91 8882080135. FAQs – Amazon, Flipkart & Meesho Onboarding How long does it take to get approved on all three platforms? Meesho is typically fastest at 2-7 days, Flipkart runs 7-15 days, and Amazon usually takes 15-30 days due to stricter verification, especially for restricted categories. Do I need GST to sell on Meesho? Yes, for most product categories, though Meesho’s overall documentation requirements are lighter than Amazon’s or Flipkart’s. Can I use the same documents for all three platforms? Mostly yes — GST, PAN, bank details, and address proof

Uncategorized

How to Run a Successful Affiliate Program for Your Ecommerce Website

Introduction At some point, most ecommerce store owners hit the same wall: ad costs keep climbing, and every new customer is getting more expensive to acquire. An ecommerce affiliate program is one of the few growth channels where you only pay when a sale actually happens — you’re recruiting a small army of bloggers, influencers, and content creators who promote your products in exchange for a commission, and you only pay out once they deliver a result. The catch is that a badly set-up affiliate program can turn into a lot of admin work for very little return. This guide walks through how to build one that actually performs — platform choice, commission structure, recruitment, and the fraud-prevention basics most beginners skip until it costs them. Choose the Right Affiliate Platform Your first real decision is whether to run your program through a hosted network or self-hosted on your own site. Hosted networks like ShareASale, CJ, or Impact come with a built-in pool of publishers already looking for products to promote, plus reliable click and sale tracking out of the box. The trade-off is cost — these networks typically charge setup fees and a cut of every transaction on top of your affiliate commissions. Self-hosted solutions — plugins like AffiliateWP or WP Affiliate Manager for WordPress-based stores — give you full control and a lower recurring cost, but you’re responsible for recruiting affiliates yourself and monitoring for fraud, since there’s no existing network doing that vetting for you. Whichever route you pick, prioritize platforms that offer real-time tracking dashboards, flexible commission rules (flat-rate and tiered), and auto-generated affiliate links and creative assets — manually building custom links and banners for every new affiliate gets unmanageable fast once your program grows past a handful of partners. Define Your Commission Structure Commission structure is where most new programs either attract strong affiliates or quietly fail to attract anyone worth having. Flat-rate commissions (say, ₹200 per sale) are simple to communicate and easy for affiliates to calculate their potential earnings from. Tiered structures — 5% standard, climbing to 7% once an affiliate crosses ₹1,00,000 in referred sales — reward your top performers and give them a reason to push harder rather than promote and forget. Cookie duration matters more than most first-time program owners expect. Thirty days is standard, but if your buying cycle is longer — think furniture, appliances, or anything people research before purchasing — a 60 to 90 day window can meaningfully boost conversions credited to your affiliates. The trade-off is more exposure to “last-click” disputes, where multiple affiliates end up claiming credit for the same eventual sale. Set a clear payout threshold (commonly around ₹1,000) and a predictable payment schedule, monthly or bi-monthly. Affiliates talk to each other — a program with a reputation for slow or unclear payouts struggles to recruit good partners no matter how generous the commission looks on paper. Recruit and Onboard Affiliates A platform and commission plan mean nothing without people actually promoting your products, and recruitment is where most programs stall. Start with a dedicated affiliate landing page that clearly states your commission rate, cookie duration, and what kind of partners you’re looking for, with a simple sign-up form. From there, your existing customers and social following are usually your fastest first affiliates — people who already like your product are far easier to convert into promoters than strangers. Beyond your existing audience, niche bloggers and influencers in your product category are worth actively reaching out to rather than waiting for them to find your program. A quick search for “[your niche] blog affiliate” or a tool like BuzzSumo to find who’s already writing about products like yours can surface partners worth a direct pitch. Once someone signs up, a slow or confusing onboarding process is one of the fastest ways to lose an affiliate before they’ve made a single sale. Send a clear welcome email with their login details, ready-to-use creative assets, and a short quick-start guide — the easier you make their first campaign, the more likely they are to actually run one. Give Affiliates Creative Assets Worth Using Affiliates promote products faster and more often when you remove the friction of having to create their own marketing material. Provide banner ads and text links in multiple sizes with several messaging variations — a plain “Shop Now” link converts differently than “Up to 50% off bestsellers.” An auto-updated product feed or CSV lets serious affiliates pull current SKUs and pricing without asking you for updates every time your catalog changes. Ready-to-send email swipe copy that affiliates can lightly customize for their own audience also removes a real barrier — many affiliates simply won’t write original promotional copy from scratch, but they’ll gladly send something you’ve already written for them. Track, Monitor, and Optimize Ongoing Performance Once affiliates are live, the real work is watching what’s actually converting and adjusting from there. Clicks that don’t turn into sales point to either the wrong affiliate audience or creative that isn’t landing — worth investigating before assuming the affiliate simply isn’t trying. Affiliates who consistently drive a higher average order value than others are often worth moving into a higher commission tier to keep them engaged. Simple A/B tests — a double-commission weekend, for instance — can reveal a lot about what actually motivates your specific affiliate base to push harder. And regular communication matters more than most program owners assume: a monthly newsletter highlighting top performers, new product launches, and quick optimization tips keeps your program top-of-mind for affiliates who are juggling promotions for multiple brands at once. Prevent Fraud and Protect Your Brand Affiliate fraud is rarely dramatic — it’s usually small, quiet abuse that adds up over time if nobody’s watching. Basic protections like CAPTCHA on your affiliate sign-up form and IP-based monitoring on click activity catch a meaningful share of low-effort fraud before it costs you real money. Clear brand guidelines matter too — spell out acceptable logo usage

Amazon

How to Sell on Amazon in 2026: Complete Step-by-Step Guide

Reviewed by the Sell Technical team — we manage Amazon seller accounts for brands across India and internationally. Introduction Every year, thousands of first-time sellers open a Seller Central account, upload a handful of products, and then stall out somewhere between fee confusion and a suppressed listing. The platform hasn’t gotten simpler — Amazon’s fee structure, Buy Box logic, and compliance rules shift often enough that advice from even a year ago can be outdated. This guide walks through how to sell on Amazon in 2026 — from account setup to your first 90 days — based on what actually matters right now, not what used to work. Quick Overview: What This Guide Covers You’ll go from zero to live seller through registration, choosing a selling plan, listing your first products, understanding fees, picking a fulfillment method, and setting up your first ad campaigns. Along the way, we’ll flag the parts that trip up most new sellers — especially Indian sellers navigating GST and local compliance on top of Amazon’s own requirements. Before You Begin: Prerequisites and Decisions A few things to sort out before you touch Seller Central: Legal structure — sole proprietorship, partnership, or Pvt Ltd/LLC — with your PAN and business registration ready GST registration — this is where a lot of Indian first-timers get caught off guard: GST registration is mandatory for online sellers in India regardless of turnover, unlike offline retail where a threshold applies A business email and a phone number that can receive OTPs A bank account in the payout currency for your target marketplace A decision on fulfillment model — FBA or FBM — since this affects your setup steps later Choose Your Selling Plan Amazon offers two main account types: Individual (pay-per-sale): lower upfront commitment, but you pay a per-item fee on every sale. Reasonable for testing the waters with a handful of products. Professional: a flat monthly subscription that unlocks bulk uploads, API access, advertising tools, and Buy Box eligibility. If you’re serious about building a real Amazon business, Professional is the only practical option — the Individual plan simply can’t compete on visibility. Plan names and exact fees vary slightly by marketplace, so confirm current numbers directly in Seller Central before committing. Create Your Seller Central Account Go to Amazon’s official seller registration page and select “Start selling” Fill in your business details — legal name, address, bank details, tax information, and identity documents Complete identity verification (this usually involves an OTP and video or ID verification) Configure your basic settings: shipping templates, return policy, and tax settings Amazon’s own onboarding flow lists exactly which documents it needs at each step — read those carefully, since incomplete documentation is one of the most common reasons registration gets delayed. Understand Fees and Calculate Real Profitability Before you list a single product, know what you’re actually paying for: Referral fees — a percentage of each sale, varying by category Selling plan fees — the monthly Professional subscription cost FBA fees — fulfillment and storage costs, which include seasonal adjustments around peak shopping periods Advertising spend, returns, and any special service fees Amazon seller fees change often enough that a margin calculation from last year won’t hold up today. Run the full math — product cost, shipping to Amazon, all fees, expected PPC spend, and a realistic return rate — using Amazon’s own revenue calculator before you commit inventory to any product. Listing Products: The Essentials Product identifiers — UPC, GTIN, EAN, or ISBN, required for most categories Title structure — brand, model, key feature, then size or color, with the most important terms placed early Bullet points — lead with the benefit, keep them scannable, and put your strongest keywords in the first line or two Images — a clean white-background main image plus lifestyle and detail shots that follow Amazon’s image specifications Backend search terms and attributes — fill every relevant field; this is what makes your listing discoverable beyond just the title If you’re creating a brand-new ASIN, double-check every required field before publishing — missing or inconsistent data is the fastest route to a suppressed listing. Fulfillment: FBA vs FBM FBA (Fulfillment by Amazon): Amazon stores, picks, packs, and ships your orders, and handles returns and customer service. It comes with the Prime badge and generally better Buy Box odds, but storage and fulfillment fees add up, especially for slow-moving inventory. FBM (Fulfilled by Merchant): you handle storage and shipping yourself. This gives you more control and can be cheaper for large or low-margin items, but you’re on the hook for meeting Amazon’s delivery speed expectations. Amazon FBA vs FBM isn’t always an either/or decision — plenty of established sellers run FBA for fast-moving SKUs and FBM for bulkier, slower items where fulfillment fees would eat the margin. Brand Registry and Enhanced Content If you hold a registered trademark on your brand, enrolling in Amazon Brand Registry unlocks A+ Content, Brand Stores, deeper reporting, and stronger protection against counterfeit or unauthorized listings. You’ll need proof of your trademark to register, so this is worth starting early if brand protection matters to your long-term strategy. Launch Strategy: Your First 30–90 Days Pre-launch: get inventory in place, finalize your keyword list, and prepare your creative assets First two weeks: run Sponsored Products campaigns (both automatic and manual) to start collecting impressions and sales data Reviews: use Amazon’s built-in “Request a Review” button and any Brand Registry-approved programs available to you — anything involving incentivized reviews outside Amazon’s own policies risks account suspension Watch your numbers: conversion rate, ACOS, return rate, and inventory health should all inform how you adjust pricing and bids over the following weeks Winning the Buy Box in 2026 Amazon weighs several signals when deciding who wins the Buy Box: fulfillment method (FBA generally helps), your landed price including shipping, seller performance metrics like on-time delivery and Order Defect Rate, inventory availability, and overall customer experience. Competitive pricing combined with fast shipping and clean account metrics

Shopify

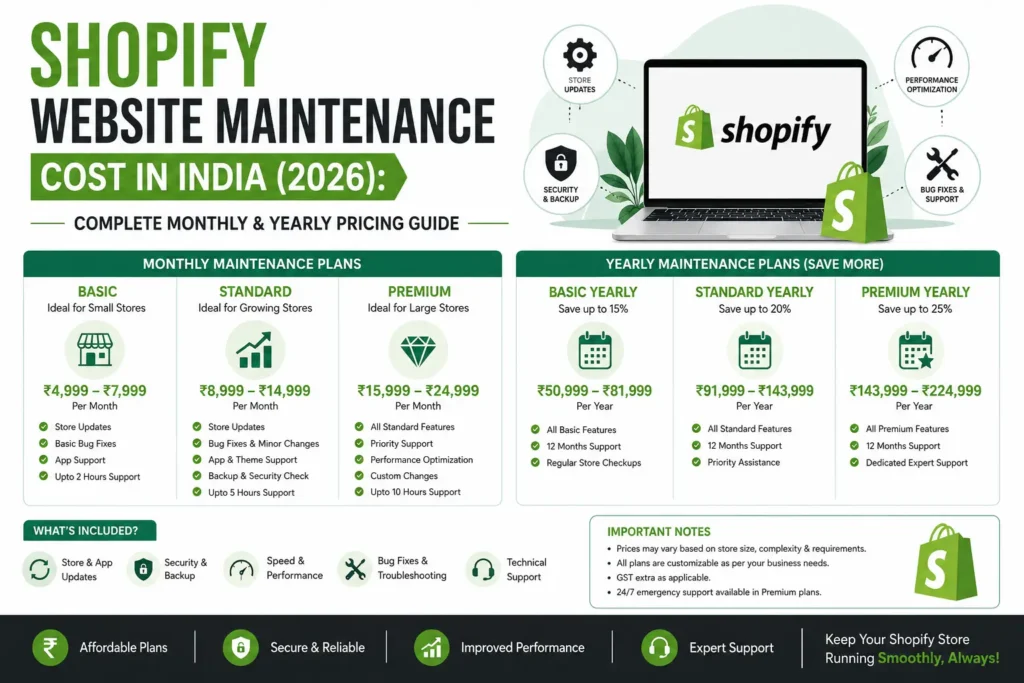
Shopify Website Maintenance Cost in India (2026): Complete Monthly & Yearly Pricing Guide.

Reviewed by the Sell Technical team — we manage and maintain Shopify stores for D2C brands across India. Introduction Most businesses budget carefully for building their Shopify store — design, apps, theme setup, payment gateways. Then the store goes live, and a few months later a new question shows up: why is it slowing down, why did that checkout app suddenly stop working, and why did last month’s sales dip for no obvious reason? That’s usually when store owners start asking about Shopify website maintenance cost in India — often after something’s already gone wrong, not before. This guide breaks down what maintenance actually costs, what you’re paying for, and where the hidden charges tend to hide — based on what we’ve seen running maintenance for stores of different sizes. What Does Shopify Maintenance Actually Mean? Shopify handles hosting, uptime, and core security patches — that part’s true. What it doesn’t handle is everything that makes your specific store run well. Shopify store maintenance is the ongoing work that keeps a live store fast, functional, and converting — not the one-time build. It typically covers: Fixing bugs and broken elements as they appear Monitoring apps for conflicts or outdated versions Keeping page speed in check as content piles up Updating product listings, pricing, and collections Catching SEO issues before they hurt rankings Resolving checkout or mobile display problems fast Development builds the car. Maintenance keeps it running after you drive it off the lot. Average Shopify Website Maintenance Cost in India Pricing varies with store size, traffic, and how many moving parts you’re running. Here’s a realistic breakdown based on what we typically see across Indian D2C and small business stores. Basic Maintenance — ₹3,000 to ₹5,000/month Pricing varies with store size, traffic, and how many moving parts you’re running. Here’s a realistic breakdown based on what we typically see across Indian D2C and small business stores. Standard Maintenance — ₹5,000 to ₹10,000/month Where most growing D2C brands land, especially if you’re running ads or investing in SEO. Adds performance monitoring, app conflict resolution, SEO upkeep, and monthly health checks. Advanced Maintenance — ₹10,000 to ₹20,000+/month Built for high-volume or subscription stores with custom features. Includes conversion rate optimization, deeper speed tuning, complex app workflow management, and priority support. A five-product store and a five-hundred-product store with three payment gateways aren’t the same maintenance job, even if they’re both “Shopify.” What’s Actually Involved in Shopify Maintenance App management: Apps update constantly, and in our experience, unmanaged apps are the single biggest reason Shopify stores slow down or start behaving unpredictably A checkout app update six months after install can quietly break a discount feature nobody notices until a customer complains. Speed optimization: Stores accumulate weight over time — extra scripts, unused apps still running in the background, themes never fully cleaned up after a redesign. It’s easy to miss until page speed starts hurting conversions. SEO upkeep: Links break as products get discontinued, metadata goes stale, and category structures drift out of alignment with how people actually search. Rankings erode slowly enough that most owners don’t notice until traffic has already dropped. Content updates done right: Prices, descriptions, and offers change often — but quick edits made without checking the front-end result can quietly break layouts or strip out SEO-friendly formatting. Conversion and UX fixes: A broken checkout step or a payment gateway that intermittently fails costs real revenue and needs same-day attention, not a “we’ll get to it” response. Hidden Shopify Maintenance Costs Nobody Warns You About A few costs tend to catch store owners off guard because they’re never part of the upfront quote: App dependency costs — more apps mean more monitoring, and app pricing itself tends to creep up over time Emergency fix premiums — skipping maintenance often means paying more later for rush fixes, usually during a sale Silent SEO decay — ranking drops rarely happen all at once; they stack up quietly until the damage is done Invisible conversion leaks — a store can look “fine” while quietly losing sales to a slow mobile load or checkout glitch nobody’s watching for Do You Actually Need a Maintenance Plan? You probably need one if you’re running paid ads, updating products regularly, relying on SEO traffic, or if downtime directly costs you sales. You might skip it if your store is mostly static, you’re not actively marketing, or traffic is very low. For most active sellers, ongoing maintenance costs less than the lost revenue from letting issues pile up. Shopify vs. WooCommerce Maintenance Cost Factor Shopify WooCommerce Hosting & Security Included Manual setup Core Updates Automatic Manual App/Plugin Conflicts Moderate Frequent Typical Maintenance Cost Lower Higher Technical Effort Low Medium–High Shopify’s maintenance overhead is generally lower simply because the platform handles more of the groundwork itself. How to Keep Maintenance Costs Down (Without Cutting Corners) Stick to fewer, well-reviewed apps instead of installing every new tool Avoid overly heavy, feature-bloated themes Plan SEO structure during development, not as an afterthought Fix small issues as they appear instead of letting them stack up Work with someone who understands Shopify’s backend specifically Cutting maintenance costs upfront almost always shows up later as a bigger repair bill. Is It Worth the Cost? If your store generates real revenue or competes for visibility through ads and SEO, then monthly Shopify maintenance charges function more like insurance for that revenue than an optional add-on. Stores that skip it tend to look fine right up until something breaks at the worst possible time. Final Takeaway Shopify website maintenance cost in India typically falls between ₹3,000 and ₹20,000+ per month, depending on your store’s size, traffic, and complexity. Skipping it doesn’t save money — it usually just delays the cost and adds interest in the form of lost conversions and slipping rankings. A well-maintained store isn’t the one that never has issues. It’s the one where issues get caught before customers ever notice. Need help figuring out the right maintenance plan for your store? Sell Technical’s Shopify development

Amazon

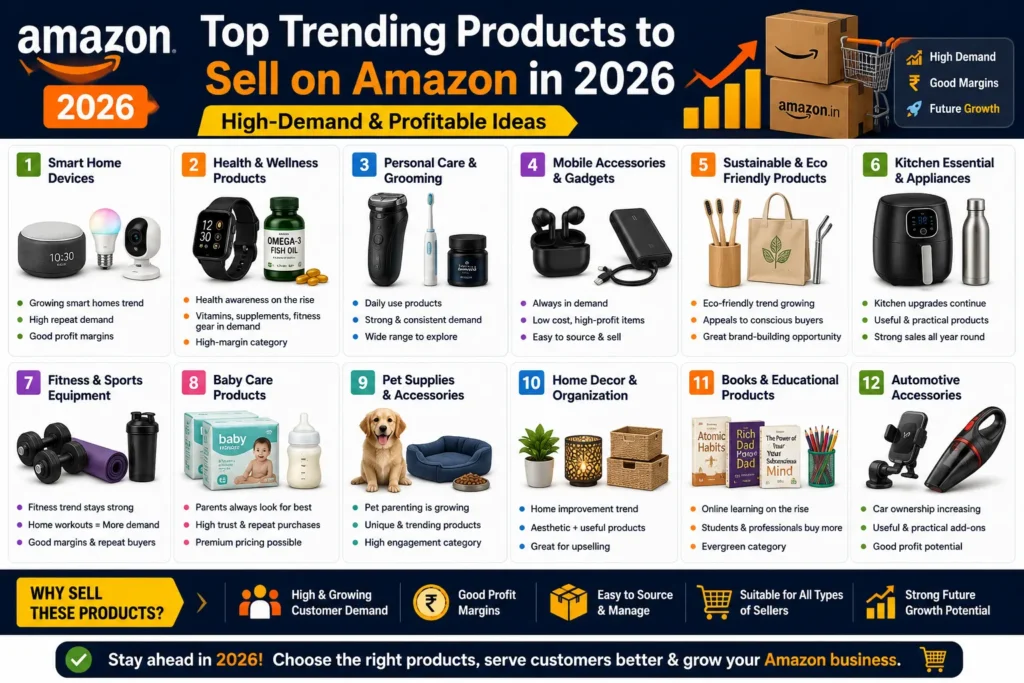
Top Trending Products to Sell on Amazon in 2026 (High-Demand & Profitable Ideas)

Introduction Selling on Amazon in 2026 is less about luck and more about choosing the right products at the right time. Amazon continues to reward sellers who: Enter growing niches early Focus on problem-solving products Align with lifestyle, health, and convenience trends In this guide, you’ll find top trending products to sell on Amazon in 2026, based on rising consumer demand, search behavior trends, profit margin potential, and ease of sourcing and logistics. This list is ideal for new sellers, private label brands, and resellers. Quick Answer The strongest categories right now are affordable smart home devices, home fitness gear, personal care and grooming tools, eco-friendly household products, and pet accessories — all favor small, lightweight, easy-to-brand items with genuine repeat-purchase demand rather than one-off “viral” products. How We Picked These Trends This list isn’t a random top-10 — each category was shortlisted against four things: rising or steady search demand, realistic margin after Amazon fees and ad spend, manageable competition for a new or mid-size seller (not just the biggest players), and FBA-friendly shipping (light, not fragile, not oversized). Categories that looked trendy but failed on shippability or margin were left off. Why Amazon Is Still a Goldmine in 2026 Despite increasing competition, Amazon remains powerful because of massive buyer trust, high purchase-intent traffic, strong logistics via FBA, and real opportunity for niche sellers. The key difference between successful and struggling sellers is product selection — and, just as often, how well the listing itself is built once you’ve picked a product. A great product with a weak Amazon listing will still underperform against a mediocre product with a sharp one. Trending Products at a Glance Category Margin Potential Competition Best For Smart Home Accessories Medium–High Medium New sellers testing automation niches Fitness & Home Workout High Medium Influencer/content-driven brands Personal Care & Grooming High Medium–High Sellers investing in branding Eco-Friendly Products Medium–High Medium Sustainability-focused brands Home Organization High Medium Visual, bundle-friendly listings Kitchen Gadgets High High Private label with real differentiation Pet Care & Accessories High Medium Repeat-purchase, loyal buyers Baby & Parenting Medium–High Medium Trust-driven, compliance-ready sellers Phone & Tech Accessories Medium High Niche-specific, not generic SKUs Office & WFH Essentials Medium–High Medium B2B/corporate gifting angles Smart Home Accessories (Affordable Segment) Smart homes are no longer luxury-only. Buyers now want budget-friendly automation. Examples: Smart plugs & switches, motion sensor lights, WiFi-enabled door sensors, smart power strips Why it’s trending: Rising adoption of smart devices, works well with impulse buying, strong repeat demand. Fitness & Home Workout Products Health remains a top priority post-pandemic, and home fitness is permanent. Examples: Resistance bands sets, adjustable dumbbells, posture correctors, foam rollers & massage balls Why it’s trending: Subscription-free fitness, influencer-driven demand, lightweight and easy to ship. Personal Care & Grooming Devices Consumers are spending more on at-home grooming solutions. Examples: Electric trimmers (niche use cases), facial cleansing brushes, hair styling tools, beard care kits Why it’s trending: High repeat purchase potential, brand loyalty opportunities, strong gifting demand. Eco-Friendly & Sustainable Products Sustainability is shifting from trend to purchase decision factor. Examples: Reusable kitchen storage, bamboo-based household items, compostable trash bags, eco-friendly cleaning tools Why it’s trending: Environment-conscious buyers, government & social push, premium pricing possible. Home Organization & Storage Products Small homes + urban living = constant demand for organization. Examples: Drawer organizers, closet storage boxes, under-bed storage solutions, modular racks Why it’s trending: Universal need, strong visual appeal (high CTR), easy bundling opportunities. Kitchen Gadgets That Solve One Problem Amazon buyers love single-purpose, problem-solving tools. Examples: Vegetable choppers, oil sprayers, spice organizers, silicone cooking tools Why it’s trending: Impulse-friendly pricing, viral potential via reels & shorts, low return rates if quality is good. Pet Care & Pet Accessories Pet parents spend more each year — and that trend is accelerating. Examples: Pet grooming tools, interactive pet toys, travel accessories for pets, feeding & water dispensers Why it’s trending: Emotional buying behavior, repeat purchases, less price sensitivity. Baby & Parenting Convenience Products Parents actively search for time-saving and safety products. Examples: Baby safety locks, portable feeding accessories, baby monitors (budget range), stroller add-ons Why it’s trending: Trust-driven purchases, high lifetime customer value, premium pricing possible. Phone & Tech Accessories Generic accessories are saturated, but niche-specific accessories still work. Examples: Phone stands for desks/cars, cable organizers, tablet accessories for kids, laptop stands Why it’s trending: Constant device upgrades, easy sourcing, low manufacturing complexity. Office & Work-From-Home Essentials Hybrid work is now permanent. Examples: Ergonomic mouse pads, desk footrests, laptop cooling pads, noise-reduction accessories Why it’s trending: Corporate gifting demand, repeat buying by professionals, high perceived value. How to Validate These Products Before Selling Before listing anything on Amazon: Check Amazon search suggestions Analyze top listings (reviews + pricing) Look for problems in negative reviews Ensure FBA-friendly size & weight Calculate fees + ad cost before sourcing — our Amazon Seller Fee Calculator makes this step quick rather than guesswork Trending does not mean profitable unless validated. Common Mistakes New Amazon Sellers Make Copying overcrowded products Ignoring branding & packaging Underestimating ad costs Choosing heavy or fragile items No differentiation strategy Avoid these and your chances of success multiply. Most of these mistakes don’t actually show up at the sourcing stage — they show up later, in ongoing account management: pricing drift, ad spend creeping without oversight, listings that were never revisited after launch. Final Thoughts: What Will Actually Work in 2026? The best products to sell on Amazon in 2026 will be problem-solving, lifestyle-aligned, easy to brand, easy to ship, and supported by content & ads. Do not chase “viral” products blindly – build around sustainable demand. Picking the right product gets you in the game; ongoing Amazon account management is what keeps you competitive once you’re in it. We Manage Amazon Seller Accounts End-to-End Sell Technical handles product research, listing optimization, and full account management so you’re not doing this alone. Contact us and get started today! Phone: +918882080135 E-mail: support@selltechnical.com FAQs – Trending Products to Sell on Amazon

E-Commerce

E-Commerce Website SEO: Complete Guide for Online Stores

Reviewed by the Sell Technical team — we handle SEO for online stores alongside marketplace account management, so we see both sides of the traffic equation. Introduction SEO is one of the few growth channels that keeps paying off after you stop actively investing in it. Unlike paid ads, which stop delivering traffic the moment you pause, a well-optimized store keeps pulling in high-intent, ready-to-buy traffic month after month — provided the site is actually structured to support it. This guide covers how e-commerce website SEO actually works, what matters most, and how online stores can rank higher on Google while converting that traffic into real sales. What Is E-Commerce SEO? E-commerce SEO is the process of optimizing an online store so its category pages, product pages, and supporting content rank for relevant search terms. Unlike a blog or a service-based website, e-commerce SEO leans heavily on product discovery, category-level rankings, transactional search intent, technical site performance, and conversion optimization once the traffic actually arrives. The goal isn’t traffic for its own sake — it’s traffic that converts. Why SEO Is Critical for E-Commerce Websites Paid ads stop the moment you stop spending. SEO, done properly, compounds — a product page ranking well in month three tends to keep ranking (and improving) in month twelve, without additional spend to maintain that position. The real benefits show up over time: higher organic product visibility, a lower blended customer acquisition cost as organic traffic grows alongside paid, sustained traffic growth that doesn’t disappear when budgets tighten, stronger trust and brand authority from ranking well for the terms your customers actually search, and better conversion rates since organic visitors typically arrive with clearer buying intent than cold ad traffic. Most online stores don’t fail at SEO because SEO doesn’t work — they fail because it’s implemented piecemeal, usually as an afterthought bolted onto a site that wasn’t built with it in mind. How E-Commerce SEO Differs from Regular Website SEO E-commerce SEO carries more moving parts than typical website SEO, and the difference matters for how you plan it: Regular SEO E-Commerce SEO Blog-focused Product & category-focused Few pages Hundreds or thousands of URLs Informational intent Transactional intent Simple structure Complex site architecture That extra complexity is exactly why planning and technical execution matter more here than on a typical content site — a mistake that costs one blog post some rankings can cost an e-commerce store an entire category’s worth of visibility if it’s baked into the site’s structure. Keyword Research for E-Commerce Websites Keyword research is the foundation everything else gets built on, and for e-commerce it splits into three distinct types that each map to a different kind of page. Product keywords — terms like “buy running shoes online” or “wireless earbuds price” — carry direct purchase intent and convert fastest. These belong on individual product pages. Category keywords — broader terms like “men’s running shoes” or “wireless audio accessories” — bring higher search volume and belong on your category pages, where they can capture demand across your whole product range rather than a single SKU. Informational keywords — searches like “best running shoes for beginners” or “how to choose earbuds” — don’t convert immediately, but they build topical authority and funnel visitors toward your product pages once they’re ready to buy. The mistake we see most often is mapping several keyword types onto the same page instead of matching each type to the page built to capture it — a product page trying to rank for a broad category term usually loses to a dedicated category page every time. E-Commerce Website Structure and SEO A clean structure helps both users and search engines find what they’re looking for without friction. Keep important pages reachable within three clicks from the homepage, use clean and readable URLs, avoid duplicate category paths that split ranking signals across near-identical pages, and use breadcrumb navigation so both Google and your visitors always know where they are in the catalog. A simple hierarchy works best: Home leads to Category, Category leads to Sub-category, and Sub-category leads to the individual Product page. Poor structure — deep nesting, orphaned pages, duplicate paths to the same product — is one of the more common reasons a technically sound store still struggles to rank. On-Page SEO for Product Pages Product pages are where sales actually happen, and where SEO mistakes are most common. Write unique product titles instead of copying supplier descriptions word-for-word (duplicate content across dozens of competing sellers using the same manufacturer copy is one of the fastest ways to get outranked). Pair that with SEO-friendly meta titles and descriptions, genuinely detailed product descriptions rather than two or three throwaway lines, properly optimized images with descriptive alt text, internal links back to relevant category pages, and visible user reviews and ratings, which help both SEO and buyer trust. Thin or duplicate product pages are consistently one of the biggest ranking killers we see on new client stores. On-Page SEO for Category Pages Category pages often outrank individual products for broader search terms, which makes them worth just as much optimization attention. Add 300 to 600 words of genuinely descriptive content rather than a bare product grid, use your H1 and H2 headings with natural keyword variations, link internally to your top-performing products, optimize filter URLs so they don’t create duplicate indexable pages, and use SEO-friendly pagination rather than infinite scroll that Google can’t easily crawl. Well-optimized category pages tend to drive the most scalable, compounding traffic of any page type on an e-commerce site. Technical SEO for E-Commerce Websites Technical SEO isn’t optional groundwork you can skip if the content is good enough — it’s the foundation everything else sits on. Fast page load speed, mobile-friendly design, secure HTTPS, proper canonical tags to prevent duplicate content issues, a crawl budget that isn’t wasted on filter and sort-parameter URLs, an XML sitemap covering both products and categories, and structured data (schema markup) for products and reviews all

Sell Technical

Sell Technical delivers expert eCommerce account management, marketplace optimization, and digital marketing solutions to help brands grow across India and global online marketplaces.