
Sell Technical

Amazon, E-Commerce

Amazon FBA Prep Requirements: Complete Packaging, Labeling & Ship-Ready Tips for 2025

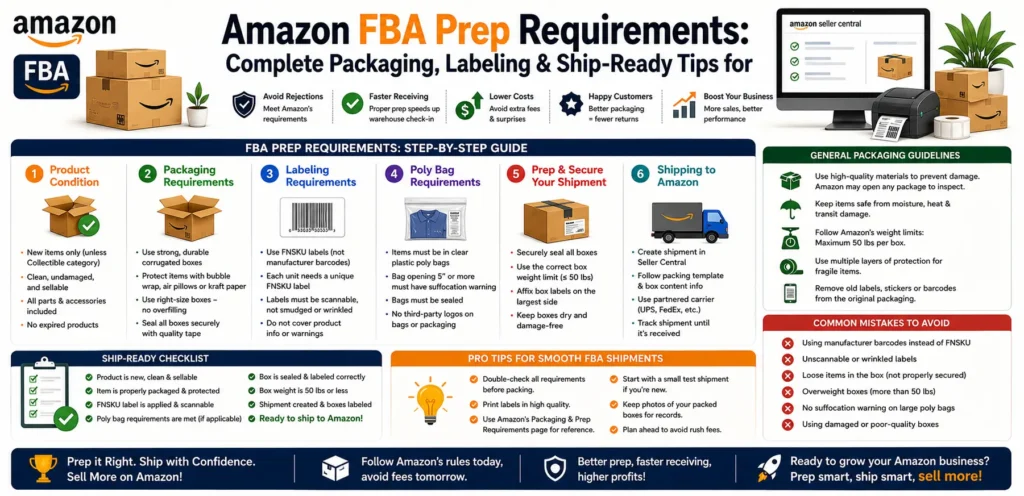
Introduction To avoid costly inbound rejections and storage delays, every Amazon FBA seller must master the prep requirements for packaging, labeling, and shipment. One major change worth knowing upfront: Amazon discontinued its in-house FBA Prep Service in January 2026, which means sellers must now handle prep themselves or work with an external prep center — there’s no longer a “let Amazon do it” fallback option. This guide covers everything you need to send inventory that arrives ship-ready under the current rules. Understanding Amazon’s Packaging Requirements Product Protection Standards Individual Oversize, Fragile, or Liquid Items: Wrap in bubble wrap or padded mailers. Sharp Edges: Cover with protective sleeves or edge guards. Sets & Bundles: Ensure all components are secured together and clearly marked. Box Standards Sealable Corrugated Boxes: Use new or like-new boxes rated for your product weight. Maximum Weight per Box: 50 lbs (22.7 kg) to protect handlers and minimize damage. Box Dimensions: As of June 2025, standard cartons are capped at 36″ length × 25″ width × 25″ height. A box may exceed 36″ in length only if it contains a single oversized item that isn’t excessively larger than the item itself (a yoga mat or tripod, for example). Minimum Box Size: Boxes should be at least 6″ × 4″ × 1″ and weigh at least 1 lb to avoid receiving delays. Girth Limit: For oversize items, length + 2 × (width + height) must not exceed 165 inches for standard sortation. Labeling Requirements & Best Practices FNSKU Labeling Unique FNSKU: Every unit must bear its Amazon-issued FNSKU label covering any other barcode. Label Placement: Centered on a flat surface, at least ½” from edges and seams. Quality: Printed at 300 dpi on white, self-adhesive label stock. Additional Label Types Expiration-Date Labels: For perishable goods — use ISO-8601 format (YYYY-MM-DD). Oversize Barcodes: For large items requiring “Amazon.com Oversize” labels. Team Lift Labels: Cartons weighing between 33 lb and 50 lb require a “Team Lift” warning label; cartons approaching the upper weight range may also need a “Mechanical Lift” label depending on final weight — check your current carton weight against Seller Central’s exact thresholds before shipping. Prep Center Labels: Since Amazon’s in-house prep service ended in January 2026, if you’re using a third-party prep center, follow their specific labeling handoff requirements rather than the old “Preparation Required” label, which no longer applies. Ship-Ready Tips: Cartons & Pallets Case-Packed vs. Individual Products Case-Packed: Multiple units of the same SKU in one inner box; each inner box receives its own FNSKU. Individual Products: Single units in a box; label each unit individually. Carton Packing Guidelines Weight Distribution: Distribute weight evenly; place heavier items at the bottom. Void Fill: Use air pillows or paper to eliminate shifting. Sealing: Use only Amazon-approved tape (polypropylene or reinforced filament) — no bundling two boxes together with tape to make one larger box; Amazon rejects this immediately. Pallet Requirements Stacking Height: Maximum of 72″ including the pallet base. Pallet Weight: Maximum 1,500 lbs total, including the pallet base. Pallet Type: Standard 40″ × 48″ wood pallets (GMA, four-way entry) in good condition — no protruding nails. Stretch Wrap: Use clear wrap only, minimum 3 wraps, with labels visible on the outside. Black or opaque wrap blocks Amazon’s label scanning and results in immediate rejection at receiving — this is a common, entirely avoidable mistake. Heavy & Bulky Exception: Single oversized items that naturally exceed standard pallet height may qualify for Amazon’s Heavy & Bulky program rather than being rejected outright. Common Pitfalls & How to Avoid Them Pitfall Solution Missing or Misplaced FNSKUs Audit each unit before packing; use a labeling jig. Overweight Cartons Use a postal scale and abide by the 50 lb limit; add Team Lift labels for 33-50 lb cartons. Damaged Boxes on Arrival Upgrade to double-wall corrugated cartons. Barcode Scanning Errors Clean and reprint labels; ensure barcode contrast. Non-Compliant Tape Switch to Amazon-approved tape types. Black/Opaque Pallet Wrap Always use clear stretch wrap so labels remain scannable. Assuming Amazon Prep Service Is Available It was discontinued in January 2026 — arrange third-party prep or self-prep instead. Preparing Your Shipment in Seller Central Create an Inbound Shipment: Go to Inventory → Manage FBA Shipments → Send/Replenish Inventory. Follow the Workflow: Select products, specify carton counts, and confirm box dimensions. Review & Approve: Amazon will generate box labels and a packing plan — download and print. Drop-Off or Ship: Follow Amazon’s carrier guidelines or use Partnered Carrier rates for cost savings. What Changed Now That Amazon’s Prep Service Is Gone This is worth its own section because it affects every seller who previously relied on Amazon to handle prep in-house. Since January 2026, all prep — labeling, poly bagging, bundling, safety warnings — falls to you or a third-party prep partner. If you’re used to sending unprepped inventory and letting Amazon sort it out, that option is gone, and inventory arriving without proper prep now faces rejection or costly non-compliance fees rather than being fixed on Amazon’s end. Final Thoughts Getting Amazon FBA prep requirements right isn’t just about avoiding a single rejected shipment — a repeated pattern of prep errors affects your account health and future shipment approval speed. With Amazon’s in-house prep service gone as of 2026, having a reliable internal process or a trusted prep partner is no longer optional for sellers who want inventory moving smoothly into fulfillment centers. Sell Technical offers full FBA prep support as part of our Amazon Account Management services — from label printing to pallet coordination — ensuring your shipments are 100% compliant and ship-ready even with Amazon’s prep service no longer available. Book Your FBA Prep Consultation → or call +91 8882080135. Frequently Asked Questions Does Amazon still offer an in-house FBA Prep Service? No — Amazon discontinued its in-house FBA Prep Service in January 2026. Sellers must now use a third-party prep center or handle prep themselves. Can I combine multiple SKUs in one carton? Yes, but only in a case-packed scenario

Amazon, E-Commerce

FBA vs. FBM on Amazon: Which Fulfillment Method Is Right for You in 2025?

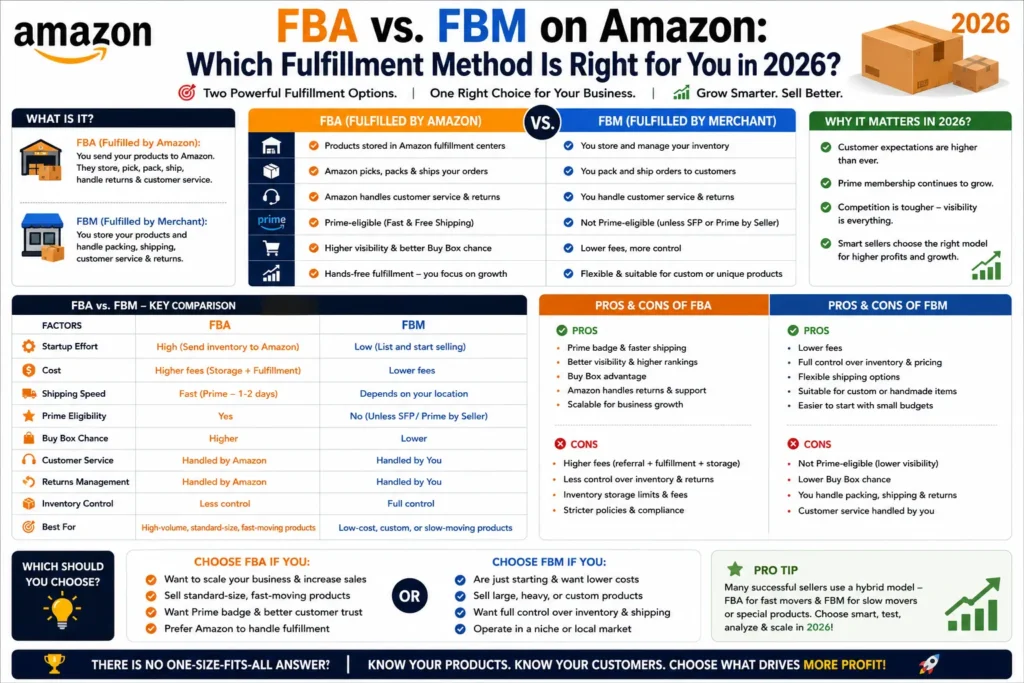
Introduction Deciding between Fulfillment by Amazon (FBA) and Fulfillment by Merchant (FBM) is one of the most critical choices you’ll make as an Amazon seller. Your choice affects delivery speed, costs, Buy Box eligibility, and customer satisfaction. In this comprehensive guide, we’ll compare FBA and FBM side by side, outline the ideal use cases for each, and provide a clear decision framework for 2026. What Is FBA? Definition: You ship bulk inventory to Amazon’s fulfillment centers. Amazon handles storage, picking, packing, shipping, customer service, and returns. Prime Eligibility: All FBA listings receive the Prime badge and 2-day shipping tag. Fees: Storage fees (monthly and long-term), pick-and-pack fees, and optional removal or disposal fees. Pros of FBA Prime Conversion Boost: Access to Amazon’s Prime member base — estimated at over 200 million worldwide (Amazon’s own last confirmed figure, from 2021; current third-party estimates run higher, in the 220-240 million range) — with fast shipping built in. Hands-Off Logistics: Amazon handles fulfillment, customer service, and returns. Multi-Channel Fulfillment (MCF): Use FBA inventory to fulfill orders from your own website or other channels. Cons of FBA Higher Costs for Slow Movers: Long-term storage fees for inventory that doesn’t sell quickly. Inventory Performance Requirements: Poor sell-through can lead to storage restrictions. Less Branding Control: Standard Amazon packaging and inserts only. What Is FBM? Definition: You store, pack, and ship orders directly, either from your own warehouse or via a third-party logistics (3PL) provider. Prime Eligibility: Not Prime-eligible by default; can qualify for Seller Fulfilled Prime (SFP) through application. Fees: You bear all fulfillment costs — packaging, shipping labels, labor, and customer support. Pros of FBM Complete Control: Branding, packaging, and unboxing experience are fully yours. Lower Upfront Fees: No Amazon storage or fulfillment fees — only your own logistics costs. Ideal for Large or Specialized Items: Products that are heavy, oversized, or seasonal. Cons of FBM No Automatic Prime Badge: Potentially lower conversion and Buy Box share. Operational Complexity: You must manage staffing, shipping carriers, and returns. Scalability Challenges: Handling surges or peak-season volume requires additional resources. FBA vs. FBM: Side-by-Side Comparison Factor FBA FBM Prime Eligibility Yes No (unless SFP) Customer Service Handled by Amazon Handled by you or 3PL Fulfillment Costs Storage + pick-pack + optional disposition Your packaging + shipping + labor Brand Control Limited (Amazon packaging) Full control over packaging & inserts Scalability High (Amazon network) Depends on your capacity or 3PL partner Speed to Customer 2-day or faster Varies by carrier and your processes Best For Fast-moving, small-to-medium items Heavy, oversized, or low-velocity products   Decision: Which Method to Choose? Volume & Velocity High velocity, small items: FBA for Prime speed and Buy Box advantage. Low velocity or bulky SKUs: FBM to avoid storage fees. Branding Needs Premium unboxing: FBM with custom inserts and branded packaging. Standard fulfillment: FBA to focus resources elsewhere. Cost Analysis Calculate your average FBA fees vs. your actual shipping and labor costs in FBM. Factor in seasonality: consider hybrid — FBA for peak months, FBM for off-peak. Customer Experience Need guaranteed 2-day delivery: FBA or SFP. Flexible delivery window acceptable: FBM. Best Practices for a Hybrid Strategy Many top sellers use a hybrid model, leveraging FBA for high-turnover SKUs and FBM for specialized or slow-moving products: Split Your Catalog: Identify top 20% SKUs by volume and send to FBA; fulfill the remaining via FBM. Seasonal Shifts: During peak sale events, increase FBA inventory to capture Prime sales. Monitor Performance: Use Amazon’s Inventory Performance and Buy Box reports to adjust your mix monthly. Next Steps Run a Fulfillment Cost Calculator: Model both FBA and FBM fees against your product costs — our Amazon Seller Fee Calculator is a good starting point for the FBA side of that comparison. Pilot Both Methods: Test FBA on a subset of SKUs while maintaining FBM for others. Optimize Continuously: Review weekly performance metrics and shift SKUs as needed. Final Thoughts There’s no universally “better” choice between FBA and FBM — the right answer depends on your product mix, margins, and how much operational control you want to keep in-house. Most established sellers eventually land on a hybrid approach rather than an all-or-nothing commitment, splitting their catalog by velocity and letting the data guide adjustments over time rather than picking once and never revisiting the decision. How Sell Technical Can Help Let Sell Technical design and manage your optimal fulfillment mix: FBA onboarding, labeling, and inbound planning FBM process setup, 3PL coordination, and returns handling SFP application and SLA compliance Ongoing cost analysis and catalog segmentation Book a Fulfillment Strategy Consultation Check out our Amazon related services: Amazon Account Management Amazon Product Listing Amazon Onboarding Amazon Sales Boost Frequently Asked Questions Can I switch from FBM to FBA at any time? Yes. You can create FBA shipments for any SKU, even if it’s been selling via FBM. Update your shipping template and send inventory to Amazon fulfillment centers. What is Seller Fulfilled Prime (SFP)? SFP allows qualified FBM sellers to display the Prime badge by meeting Amazon’s delivery and performance standards. It requires an application and adherence to strict metrics. How do storage limits affect my FBA strategy? Amazon imposes storage limits based on your Inventory Performance Index (IPI) score. Low IPI can restrict how much inventory you send. Regularly clear excess stock or switch slow movers to FBM. Is a hybrid FBA/FBM approach actually worth the extra complexity? For sellers with a mixed catalog — some fast-moving, some slow or bulky — yes. The added coordination is usually offset by avoiding unnecessary FBA storage fees on slow movers while still capturing Prime advantages on top sellers. Yes. You can create FBA shipments for any SKU, even if it’s been selling via FBM. Update your shipping template and send inventory to Amazon fulfillment centers. SFP allows qualified FBM sellers to display the Prime badge by meeting Amazon’s delivery and performance standards. It requires an application and adherence to strict metrics. Amazon imposes storage limits based on your Inventory Performance

E-Commerce, Myntra

How to Use UGC (User-Generated Content) to Boost Trust & Sales on Myntra

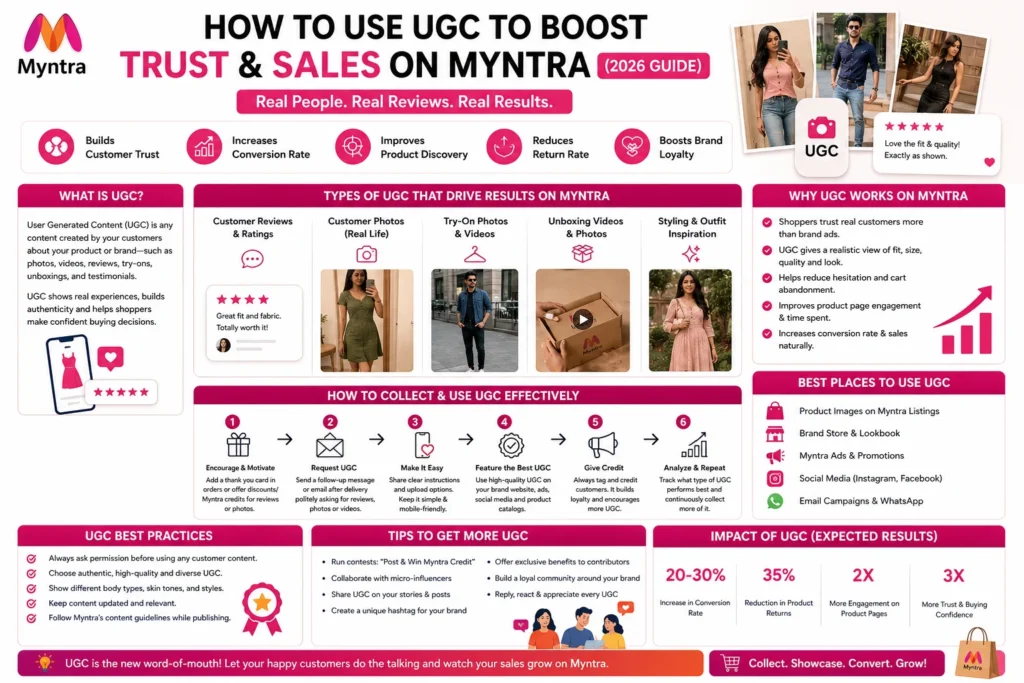
Introduction User-generated content — reviews, customer photos, unboxing videos, testimonials — has become a cornerstone of e-commerce credibility. On a marketplace like Myntra, where visuals and social proof heavily influence buying decisions, strategically incorporating Myntra UGC can meaningfully improve trust and sales. This guide walks through five actionable steps to harness UGC for your Myntra store. Encourage and Curate Authentic Reviews Automate review requests. Check your current Seller Portal for available review-prompt settings — Myntra’s exact menu structure for this can change, so confirm the live path rather than relying on any guide, including this one. The general principle holds regardless of the exact menu location: prompting reviews a few days post-delivery, while the purchase is still fresh, consistently produces better response rates than leaving it to chance. Incentivize photo reviews. Offer a small reward — a discount code, entry into a giveaway, or SuperCoins where applicable through Myntra’s loyalty mechanics — for customers who upload photos alongside their written review. Moderate and showcase. Regularly audit incoming reviews to identify your strongest, most authentic UGC. Highlighting genuine photo reviews prominently — rather than letting them sit buried in a long review list — is where most of the trust-building value actually gets realized. Listings with a healthy volume of genuine photo reviews consistently outperform text-only listings on conversion, though the exact lift varies by category and current baseline — track your own before-and-after numbers rather than assuming a fixed industry percentage applies to your catalog. Integrate UGC into Your Product Listings Feature customer photos prominently in your gallery, not buried after all your studio shots — shoppers scanning quickly should see real customer results early, not just polished product photography. Embed UGC in your listing content where the format allows — a “Real Customers, Real Styles” style carousel featuring a handful of vetted UGC shots with brief captions works well if your listing format supports it. Write UGC-informed bullet points. Pull genuine themes from your best reviews (fit, fabric feel, durability) to inform benefit-focused bullet copy — even without directly quoting, understanding what customers actually value helps you write more convincing, more honest copy. Buyers generally place more trust in peer-generated photos than in studio shots alone, since real customer images show how a product actually looks and fits in practice — this is a well-established general principle in e-commerce, even without pinning an exact trust percentage to it. Leverage UGC in Your Storefront & Marketing Feature UGC in your Myntra storefront, if your brand’s storefront format supports a rotating image carousel or banner — a consistent branded hashtag (see step 4) makes this easier to source content over time. Amplify on social media. Share your best Myntra-sourced UGC on Instagram and Facebook, tagging the original customer with their permission — this often encourages further participation from other customers who want similar recognition. Use UGC in email campaigns. A “customer looks” style newsletter featuring real buyer photos, linking back to your Myntra listings, gives existing customers a reason to browse again and gives new prospects social proof before they even land on the listing. Campaigns that feature genuine customer content generally outperform those using only brand-produced creative on engagement metrics — track your own click-through and conversion data before and after incorporating UGC to see your actual lift, rather than assuming a universal percentage. Build a Community Hashtag Campaign Create a unique, brand-specific hashtag — something simple and ownable, like #YourBrandStyle. Promote it in packaging and order confirmations. A simple insert card — “Share your look with #YourBrandStyle for a chance to be featured” — costs very little and consistently generates a steady trickle of fresh content. Run periodic contests. Award a modest prize (a discount code, a gift voucher) to standout UGC posts each quarter, and actually display winners prominently — the visibility of past winners is what motivates future participation. A branded hashtag does double duty: it generates fresh, authentic content on an ongoing basis, and it builds a genuine sense of community around your brand that a one-off review request never does. Measure, Optimize, and Iterate Track UGC’s actual impact on your sales. Compare conversion rates for SKUs before and after UGC integration using whatever performance analytics your Seller Portal provides — this is the only way to know your real lift rather than assuming a generic industry number applies to your specific catalog. A/B test UGC placement. Try customer photos in different gallery positions and measure the change in engagement or add-to-cart behavior rather than assuming one placement is universally best. Gather direct feedback. A quick one-question post-purchase survey — “Did seeing customer photos help your decision?” — gives you a direct read on whether your UGC strategy is actually landing with buyers, not just a proxy metric. Set your own realistic improvement goal based on your current baseline rather than chasing a specific industry-wide percentage you can’t verify applies to your situation — the point is consistent, measured improvement over time, not hitting an arbitrary external number. Final Thoughts Myntra UGC works because it does something brand-produced content structurally can’t — it shows real people getting real value from a product, which is exactly the kind of proof fashion shoppers look for before buying something they can’t try on first. The sellers who benefit most treat this as an ongoing system (automated requests, a branded hashtag, regular measurement) rather than a one-time content push that fades after the first month. If you’d like expert help setting up automated review requests, curating the best customer content, and optimizing your storefront around it, Sell Technical offers end-to-end UGC integration as part of our Myntra services. Book Your UGC Strategy Call → or call +91 8882080135.   Myntra Account Management Myntra Product Listing Myntra Onboarding Myntra Sales Boost Frequently Asked Questions How many photo reviews should I aim to display? There’s no universal magic number — a healthy, growing collection of genuine photo reviews matters more than hitting a specific count. Focus on making it easy for

Discover sale dates, can’t‑miss categories, lightning deal strategies, and a complete checklist to shop like a pro.
Amazon, E-Commerce

Amazon Great Freedom Sale 2025: Dates, Top Deals & Expert Shopping Tips

Amazon Freedom Sale 2025: Dates, Top Deals & Expert Shopping Tips The Amazon Freedom Sale is one of the biggest shopping events of the year, featuring massive discounts across electronics, fashion, home & kitchen, beauty, and more. In this comprehensive guide, you’ll learn: Exact sale dates & timings Top product categories to watch Pro deal‑hunting strategies Must‑buy product hit list Essential tools & checklist Follow our step‑by‑step plan to maximize your savings and snag the best offers before they’re gone. 1. Key Dates & Timings Event Date & Time (IST) Early Access for Prime July 1–3, 2025 at 12 AM Main Freedom Sale July 4–7, 2025 at 12 AM Lightning Deals Every Day 12 PM, 4 PM, 8 PM Last‑Minute Flash Sales July 7, 8–10 PM Tip: Activate your Prime trial by June 28 to lock in early access deals. 2. Top Categories to Watch Electronics: Smartphones, laptops, wearables Fashion & Accessories: Apparel, footwear, watches Home & Kitchen: Cookware, décor, storage solutions Beauty & Personal Care: Skincare gadgets, makeup kits Furnishing & Décor: Rugs, lighting, furniture accents These categories historically see discounts up to 70% – plan your wish list accordingly. 3. Pro Deal‑Hunting Strategies Lightning Deals: Add desired items to your Watch List early. Refresh the Lightning Deals page 5 minutes before each slot. Coupon Stacking: Clip all available coupons on product pages. Combine manufacturer coupons with site‑wide promo codes. Price Tracking Tools: Use Keepa or CamelCamelCamel browser extensions to monitor price history and set drop alerts. Mobile‑Only Offers: Check the Amazon App’s “Today’s Deals” section – mobile users often get extra coupon codes. Bank & EMI Offers: Link your credit/debit card early to unlock bank‑specific cashback (e.g., 10% with SBI cards). 4. Must‑Buy Product Hit List Smartphones: Look for flagship models from Xiaomi, Samsung, and OnePlus. Headphones & Earbuds: Sony WH‑1000XM5, Apple AirPods Pro 2. Kitchen Appliances: Instant Pot Duo Nova, Philips Airfryer. Home Office Gear: Logitech MX Keys, Dell UltraSharp monitors. Fashion Bundles: Branded activewear sets – often 2 for 1 deals. Bookmark this list and check stock levels daily—hot items sell out within minutes. Frequently Asked Questions What is the Amazon Freedom Sale? The Amazon Freedom Sale is a major shopping event in India featuring steep discounts across categories like electronics, fashion, home & kitchen, and beauty. It typically runs for several days in July. When will the Amazon Freedom Sale 2025 take place? In 2025, the main sale runs July 4–7, with early access for Prime members from 31st July, Noon. What are Lightning Deals and how do they work? Lightning Deals are time‑limited, limited‑stock offers that go live at specific times (e.g., 12 PM, 4 PM, 8 PM). You must add items to your Watch List in advance to receive alerts when a Lightning Deal goes live. Can I stack coupons during the Freedom Sale? Yes. Before the sale, clip all available manufacturer and site‑wide coupons on product pages. At checkout, apply both the product coupon and any applicable promo code for maximum savings. What payment methods yield extra discounts? In this sale, you can avail 10% instant discount with SBI credit card and EMI transactions. Ready for the Freedom Sale? Don’t risk missing out on the biggest chance of the year. Let Sell Technical handle your Amazon store’s listing optimization, deal‑prep, and performance monitoring – so you can grab this opportunity and grow as a seller. Check out our Amazon related Services: Amazon Account Management Amazon Onboarding Amazon Product Listing Amazon Sales Boost

E-Commerce, Pepperfry

Pepperfry Onboarding Tutorial: How to Onboard Your Brand in 2025

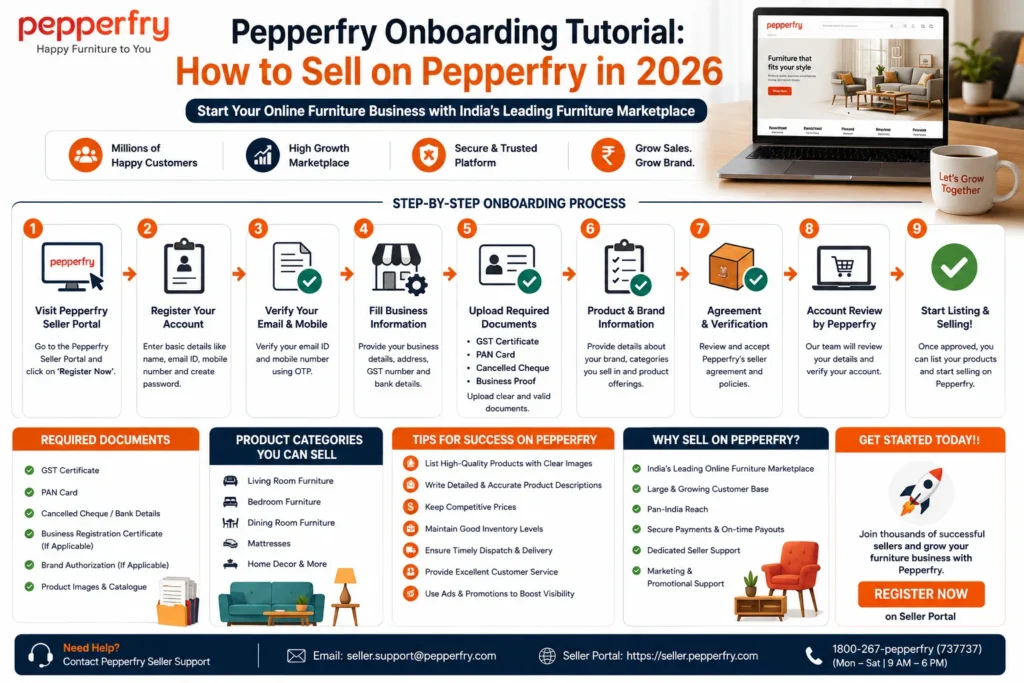
Introduction India’s furniture and home décor market is projected to reach $37.72 billion by the end of 2026 — and Pepperfry sits right at the center of that growth. With over 185 studios across India, 10,000+ seller partners, and a product sold every 25 seconds on its platform, it’s one of the most focused and high-intent marketplaces an Indian furniture or home décor brand can be on. But “focused” also means selective — Pepperfry has strict quality, documentation, and logistics standards that trip up sellers who go in without preparation. This Pepperfry onboarding tutorial walks you through every step of the process in 2026 — from gathering documents to getting your first listings live — including the parts most guides skip entirely: 3D visualization requirements, large-item logistics, and what Pepperfry’s commission structure actually looks like by category. Why Sell on Pepperfry? Before the how, a quick case for the why — because Pepperfry isn’t the right fit for every seller, and understanding the platform helps you decide early. Pepperfry specializes in furniture, home décor, lighting, kitchenware, and lifestyle accessories. If your product fits one of those categories, you’re selling on a platform where the shopper already has high purchase intent — they’re not browsing generally, they’re actively furnishing a home. That intent-driven audience converts better than a general marketplace for these specific categories. The logistics model is also genuinely different. Pepperfry owns 370 trucks and operates 4 large sourcing centers in Jodhpur, Delhi, Mumbai, and Bengaluru — meaning your large-item fulfillment is handled with actual infrastructure, not bolted-on third-party logistics that treats a dining table the same as a t-shirt. The tradeoff: commissions range from 15-30% by category (higher than most horizontal platforms), and the listing quality bar — especially for premium furniture with 3D visualization requirements — is real. This guide helps you clear that bar the first time. Check If Your Products Qualify Before registration, confirm your product category is listed on Pepperfry. The main categories are: Furniture (living room, bedroom, office, outdoor) Home décor and accessories Lighting and lamps Kitchen and dining Furnishings (curtains, cushions, rugs) Bath accessories Pet furniture and accessories If your products fall outside these categories, Pepperfry is the wrong marketplace — and knowing that before you start saves weeks of wasted effort. Gather Your Documents This is where most sellers lose time. Have everything ready before you start registration — uploading documents midway and waiting for approvals adds days to an otherwise fast process. Required for all sellers: GST Registration Certificate (GSTIN) PAN Card Cancelled cheque (bank account verification) Business Registration Certificate Director/proprietor photo ID Required for brand sellers: Brand trademark certificate (if applicable) Brand logo (high resolution, transparent background) Brand authorization letter (if you’re a distributor, not the brand owner) For your product catalog: High-resolution product images (minimum 1500×1500 px, white background) Lifestyle images showing products in a room context 3D visualization files for premium/large furniture listings (more on this below) Accurate product dimensions, materials, weight, and care instructions Register on the Pepperfry Seller Portal Go to seller.pepperfry.com and click “Register Now” Enter your business name, email address, phone number, and create a secure password Verify your email and mobile number via the OTPs sent to both You’ll land in your Seller Dashboard once verified One thing to know: Pepperfry’s seller registration is invitation-influenced for certain premium categories. If you’re in high-end furniture, you may need to submit an expression of interest first and wait for category team review before full portal access. This isn’t widely documented — if you hit a wall at registration for a premium category, contact Pepperfry’s seller support directly rather than assuming the portal is broken. Complete KYC and Bank Setup Navigate to Settings → KYC & Payments in your Seller Dashboard Upload all required documents: GSTIN, PAN, cancelled cheque, business registration, director ID copies Enter your bank details: IFSC code, account number, account holder name (must match your business registration exactly — mismatches are the #1 cause of KYC rejection) Submit and wait for approval — Pepperfry’s KYC review typically takes 48-72 hours Common rejection causes: Business name on GSTIN doesn’t exactly match bank account holder name Blurry or cropped document scans Cancelled cheque from a personal account instead of business account Missing director ID for private limited companies Set Up Your Brand Storefront This step separates sellers who get traction from those who don’t. Your storefront is what a shopper sees when they click on your brand name — it’s your credibility signal on the platform. Go to Brand Settings in your dashboard Upload your brand logo (recommended: PNG with transparent background, minimum 300×300 px) Upload a brand banner (recommended size: 1200×300 px) Write a Brand Story of 150-200 words — describe your manufacturing process, craftsmanship, materials, or the design philosophy behind your products. Pepperfry shoppers are more design-conscious than average eCommerce shoppers; a generic “we make quality furniture” won’t connect. Enable your Storefront URL (e.g., pepperfry.com/stores/YourBrandName) Upload Your Products For smaller catalogs (under 20 SKUs): Manual Upload Go to Catalog → Add New Product Fill in: Title, SKU, MRP, Selling Price, Stock Quantity Upload minimum 5 images per SKU (white background main image + 2-3 lifestyle shots + 1 dimension/detail shot) Complete all mandatory attributes: exact dimensions (L×W×H in cm), primary material, color, finish, weight, assembly requirement, warranty period, and care instructions The attribute completeness rule: Pepperfry’s catalog team rejects listings with missing mandatory attributes — not just flags them, outright rejects them. Complete every field even if it seems optional. For larger catalogs (20+ SKUs): Bulk Upload Go to Catalog → Bulk Upload Download the current CSV template (download fresh each time — Pepperfry updates the template periodically and old templates get rejected) Populate all columns — save as UTF-8 encoded CSV, not Excel default encoding Upload and wait for processing (usually under 30 minutes) Check the error report after processing — Pepperfry generates a row-by-row error file showing exactly which SKUs failed and why The 3D Visualization Requirement (Most Guides Skip

E-Commerce, Shopify

Shopify SEO Optimization for Higher Google Rankings

Introduction Increasing organic traffic to your Shopify store starts with understanding something most sellers get wrong: Shopify handles a meaningful chunk of technical SEO automatically, but “handles the basics” isn’t the same as “fully optimized.” Shopify SEO optimization is really about knowing exactly where Shopify’s automation stops and your manual work needs to start — and that line is different from WordPress, Magento, or any other platform, since Shopify’s specific architecture creates its own quirks and constraints. This guide covers what Shopify does for you out of the box, what you need to actively manage yourself, and the platform-specific details generic SEO advice tends to skip entirely. What Shopify Already Handles for You Shopify’s built-in infrastructure covers several core technical tasks automatically: clean, crawlable site architecture, automatically generated XML sitemaps, canonical tags that help prevent duplicate content issues, and reasonably fast baseline hosting performance via its CDN. This is a real advantage over a self-hosted platform where you’d need to configure all of this manually — but it also means sellers sometimes assume “Shopify is SEO-friendly” translates to “my store is optimized,” which isn’t the same thing at all. What You Still Need to Optimize Manually Everything content and structure-related is still on you: page titles and meta descriptions, image alt text, URL slugs for products and pages, internal linking, content depth on collection and product pages, and app bloat management. None of this happens automatically just because you’re on Shopify. Shopify-Specific Quirks Most Guides Don’t Mention You can’t fully customize collection and blog URL structures. Shopify enforces /collections/ and /blogs/ prefixes by default — a real constraint compared to platforms with fully flexible permalink structures. Product and page URLs remain editable, so focus your URL-cleanup effort there instead of fighting a structural limitation you can’t remove. Collection pages are underused as an SEO asset. Most Shopify stores treat collection pages as pure product grids with no actual content — a missed opportunity, since a collection page targeting a broad category keyword (“men’s running shoes”) with genuine descriptive copy above or below the grid can rank for exactly the kind of high-volume, broader-intent searches product pages are too specific to capture. Apps are the single most common cause of Shopify stores slowing down. Every installed app adds scripts that can drag down load time, and unlike a lean custom build, it’s easy to accumulate apps over time without auditing which ones are still earning their keep. A quarterly app audit — genuinely asking whether each one still justifies its performance cost — is worth the discipline. Theme choice affects SEO more than sellers expect. A bloated, poorly coded theme creates the same performance drag as too many apps, just baked in at a more fundamental level. Lightweight, well-maintained themes consistently outperform feature-heavy ones on Core Web Vitals. Core Web Vitals and Speed on Shopify Google’s Core Web Vitals directly factor into ranking, and Shopify stores are not automatically exempt from performing poorly here. Practical steps that make a real difference: compress images before uploading rather than relying on Shopify to do it for you, use responsive image sizing and lazy loading for anything below the fold, and remove unused apps and scripts rather than just deactivating them (deactivated apps can still leave code behind). Aim for load times under three seconds — beyond that threshold, both rankings and conversion rates measurably decline together, not independently. On-Page SEO Fundamentals for Shopify Titles and meta descriptions should be written for every product and collection page individually — Shopify’s defaults auto-generate from your page title, which is a reasonable fallback but rarely as compelling or keyword-targeted as something written deliberately. Image alt text matters both for accessibility and for image search visibility — describe what’s actually in the image rather than stuffing it with keywords disconnected from the visual content. Internal linking between related products and collections helps both users and search engines understand your catalog’s structure — Shopify doesn’t do this for you automatically beyond basic navigation menus. Setting Up the Tools You Actually Need Before optimizing individual pages, get the measurement layer in place: install Google Analytics 4 to track traffic and behavior, connect Google Search Console to monitor indexing and search performance, and if you haven’t already, move off a myshopify.com subdomain onto a custom domain — a subdomain limits both your brand credibility and your SEO flexibility in ways that are easy to overlook until you’re trying to fix it later. Content Strategy: Where Shopify Stores Leave the Most on the Table Product and collection pages alone rarely carry a full SEO strategy — supporting blog content that targets informational, higher-funnel searches (buying guides, comparisons, use-case content) extends your reach to shoppers who aren’t ready to buy yet but will be soon. Stores with genuinely active, well-structured blogs consistently outperform those without one on organic traffic over time, since blog content compounds in a way product pages with limited natural search volume don’t. Preparing for AI-Driven Search Search behavior is shifting — a meaningful and growing share of queries now trigger AI-generated summaries rather than a traditional list of blue links. Optimizing for this doesn’t require abandoning traditional SEO; it means writing clearer, more direct-answer content, using FAQ-style subheadings that mirror how people actually ask questions, and implementing FAQ schema markup where relevant. Content built this way tends to perform well in both traditional search and AI-summary contexts, rather than requiring two separate strategies. Common Shopify SEO Mistakes Leaving default, auto-generated titles and meta descriptions unedited across the whole catalog. Treating collection pages as empty product grids with zero supporting content. Letting apps accumulate without ever auditing which ones still matter. Skipping a custom domain and staying on a myshopify.com subdomain long-term. And publishing product pages with minimal, spec-only descriptions that don’t actually target how real buyers search. Final Thoughts Shopify SEO optimization isn’t about fighting the platform — it’s about knowing precisely where its automation ends and stopping there with generic assumptions. Collection pages, app discipline, custom

E-Commerce, Flipkart

How to Use Flipkart Seller Central Analytics to Grow Your Sales

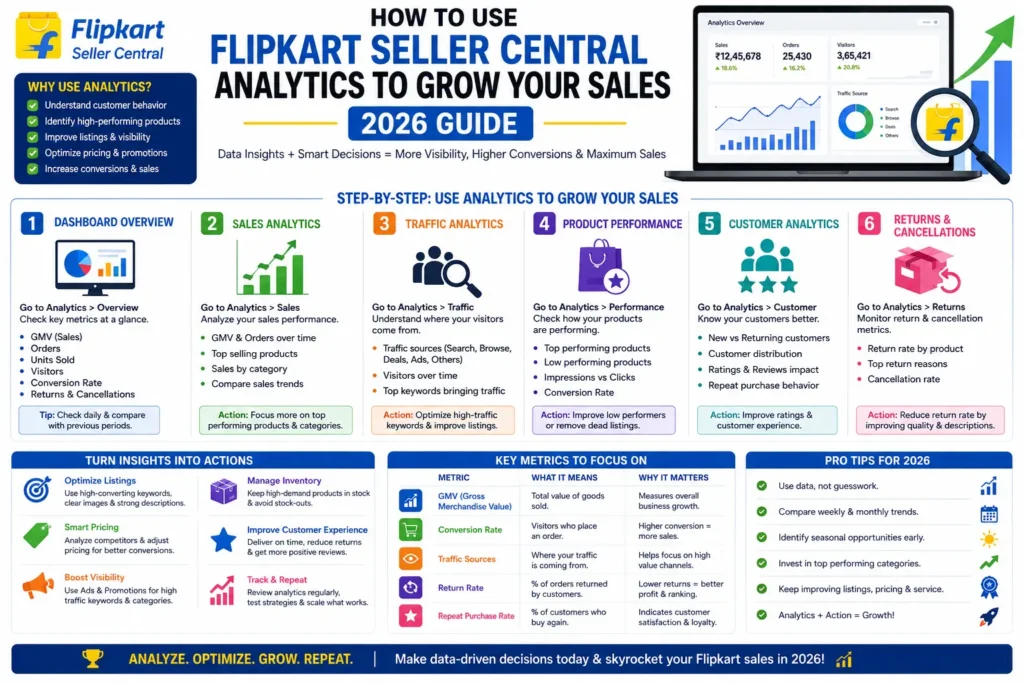
Introduction Flipkart’s Seller Central is a goldmine of data — when you know how to interpret it. Most sellers log in, glance at a sales number, and log back out without ever touching the reports that actually explain why that number moved. This tutorial-style guide shows you exactly which Flipkart Seller Central analytics reports to focus on, how to translate the numbers into specific actions, and the tactics that compound into real sales growth in 2026 when applied consistently rather than checked once and forgotten. Quick Answer The five metrics that matter most are Sessions & Impressions (visibility), Conversion Rate (efficiency), Average Order Value (upsell potential), Buy Box Win Rate (competitiveness), and Return/Cancellation Rate (quality). Review them weekly, not monthly — sellers who catch problems within days fix them before they compound into ranking drops. Step 1: Identify Your Key Performance Indicators (KPIs) Before diving into reports, pin down the metrics that move the needle: Sessions & Impressions: Track visibility trends. Conversion Rate: Sales ÷ Sessions — your core efficiency metric. Average Order Value (AOV): Insight into upsell opportunities. Buy Box Win Rate: Determines how often you’re the default seller. Return Rate & Cancellation Rate: Flags product or fulfilment issues. Action: In Seller Central, go to Performance → Business Reports and note these KPIs for the past 30 days as your baseline. Analyze Traffic Sources & Category Performance Search vs. Discovery Search Traffic: Customers using keywords on Flipkart’s search bar. Discovery Traffic: Browsing via category pages, banners, or recommendations. Action: In Business Reports → Traffic Dashboard, compare Search vs. Discovery. If Discovery is low, optimize your category titles and browse-node placement. Top-Performing Categories Drill into Catalog → Category Performance to see which sub-categories yield the highest conversion rates. Tip: Shift promotional budget or featured slots toward top-converting categories to quickly boost sales. Deep-Dive into Listing Health & Conversion Funnels Listing Quality Score Flipkart scores listings on content completeness, image quality, and attribute accuracy. Action: In Catalog → Listing Quality, identify your lowest-scoring products relative to your catalog average — check the exact scoring thresholds in your current dashboard rather than assuming a fixed cutoff, since this can vary — and update titles, bullets, images, and attributes on those first. Tracking Lost Sales in the Funnel If sessions and impressions are healthy but conversion is weak, the gap is usually pricing, shipping cost, or a trust signal missing from the listing rather than a traffic problem. Review your funnel data in Performance → Business Reports to see where in the process — product page view, add-to-cart, checkout — the drop-off actually happens, since the fix differs depending on which stage is leaking. Fix: If drop-off is concentrated at checkout specifically, a limited-time coupon via Promotions → Coupons can re-engage price-sensitive shoppers who added to cart but hesitated. Optimize Pricing & Promotions Using Margin Analytics Price Elasticity Testing Use Reports → Price Comparison to see how small price changes affect sales volume. Action: Test a 5% price drop on slow-moving SKUs and measure lift in conversion over 2 weeks. Promotion ROI In Promotions → Performance, compare your top coupon campaigns by incremental sales versus discount cost. Tip: Allocate more budget to the highest-ROI promotions and sunset underperforming ones. Our Flipkart Sales Boost service handles exactly this kind of ongoing promotion analysis if you’d rather not run it manually every week. Monitor Inventory Turnover & Stock Health Days of Supply Check Inventory → Stock Health, focusing on DoS for bestsellers. Too low means stock-outs; too high ties up capital. Restock Recommendations Flipkart’s suggested restock quantities help maintain Buy Box eligibility. Action: Set automated reorder alerts well ahead of your typical reorder lead time to prevent DoS from dropping below optimal levels — the exact percentage threshold that works best depends on your specific supplier lead times, so treat 30% as a starting point to test, not a universal rule. Leverage Customer Feedback & Ratings In Performance → Ratings & Reviews, identify products with below-average ratings relative to your catalog. Read low-rating feedback to spot recurring product or service issues. Fix: Address common complaints — update product descriptions, improve packaging, or escalate quality control. Then request reviews from satisfied customers via Marketing → Feedback Requests. Iterate with Weekly Analytics Sprints Set a Weekly Review: Every Monday, export your top KPIs and compare against the previous week. Run Hypothesis-Driven Tests: “If I improve listing quality, conversion will increase” — then actually measure it rather than assuming. Document & Scale: Any tactic that lifts sales — document the steps and apply it to your top 20% of SKUs. This weekly habit is where meaningful sales growth actually becomes realistic — not from any single tactic above, but from compounding small, tested improvements consistently over months rather than treating this as a one-time audit. Benchmark Against Competitors, Not Just Your Own History Tracking your own week-over-week trend tells you whether you’re improving. It doesn’t tell you whether you’re improving fast enough relative to competitors selling similar products. Use the Price Comparison report alongside manual spot-checks of top-ranking competitor listings in your category — note their pricing, review count, and listing completeness. If a competitor is consistently winning the Buy Box on a product similar to yours, the gap is almost always one of price, fulfillment speed, or listing quality — and it’s usually visible once you actually compare side by side instead of assuming. Read Your Analytics Differently During Sale Events Flipkart’s major sale events — Big Billion Days and similar festival promotions — genuinely can produce outsized spikes in traffic and sales, and reading your normal weekly baseline against a sale-event week will give you misleading conclusions in both directions. A conversion rate that looks fantastic during a flash sale isn’t necessarily replicable the rest of the year, and a temporary dip in Buy Box Win Rate during a high-competition sale period isn’t necessarily a real problem with your listing. Keep a separate baseline for sale-event periods specifically, and compare this year’s event performance against

Sell Technical

Sell Technical delivers expert eCommerce account management, marketplace optimization, and digital marketing solutions to help brands grow across India and global online marketplaces.